|
Hi friends! It's Suzanne, happy to be back on the Patterned Paper Plate. The Patterned Paper Dad and I are part of a committee at our church that plans a fundraising Christmas Fair. One of the stations at that fair is a Christmas tree filled with handmade ornaments that people can purchase for a small donation. I started crafting some ornaments for that tree so I thought I would share with you what I'm making to celebrate Christmas in July and add a little chill to these dog days of summer. For the first one, I use a small piece of wood, three white buttons and the tiniest scraps of fleece material. A little bit of paint and my trusty glue gun are also needed. I'm starting with a piece of wood that is 3 inches long and about 1.5 inches wide. This is a piece of a wooden mini blind slat that was salvaged when my brother and sister-in-law changed out the blinds in their house. To start, I paint the wood with a light wash of red paint.
I then glue on 3 graduated sizes of white buttons in the shape of a snowman. To finish this little ornament off, I punch a hole at the top of the wood and string a piece of twine to use as a hanger. To make the snowman's hat, I take the tiniest rectangle of fleece fabric and tie a bit of twine around it, about two thirds from one end, then fold over the bottom edge to make a small cuff. This gets glued to the wood right above the top button. I also take a small piece of fleece, knot it in the middle and glue that below the top button to act as the snowman’s scarf.
This easy peasy Christmas ornament took about 5 minutes to make and will be perfect to mass produce. I thought the snowman was so cute, I wondered how green buttons would look in a Christmas tree shape. Also super cute as it turns out! For this one, it’s the same small piece of wood with a light wash of red paint, hole in one end and twine tied through for a hanger. For the tree, I glue 4 green buttons in graduated sizes on to the wood and finish it off with a teeny tiny bow to top the tree.
For our second ornament, I'm making use of my copious supply of paper and stickers. For this ornament, I use 3 paper punches – a 1.25 inch circle, a 2.25 inch scalloped circle and a 2.5 inch circle, some glitter paper, snowman stickers and some thin plastic poker chips I purchased at the dollar store. This ornament also uses baker's twine and my glue gun.  To start, I punch out 1 2.5 inch circle from heavy white cardstock, 2 2.25 inch scalloped circles and 2 1.25 inch circles from the glitter paper. To assemble, I glue 1 2.25 inch scalloped circle to the center of the white 2.5 inch circle, sandwiching the end of a length of baker’s twine between them. I then glue 1 poker chip on top of that, then layer a 1.25 inch circle on top of the poker chip, allowing the rim of color to show.
A snowman sticker is glued to the center of the ornament and the entire process is repeated on the other side of the white circle, to make the ornament two sided. As a variation, I use some teeny wooden shapes I found in my Christmas stash.
The last ornament I'm making today is a bit of a throwback – it’s a puzzle piece wreath. The Patterned Paper Dad really enjoys doing puzzles and when we got to the end of one, we found that there was one piece missing. Rather than pass along the frustration of an unfinished puzzle, I decided to use the pieces for crafting. To start this one, I trace a 3 1/2 inch circle onto some heavy card stock, cut that out and then punch the middle out using a 2.5 inch circle punch to make the base of the wreath.
I glue one layer of puzzle pieces until the shape is full, then add a second layer over the first, offsetting the pieces. I use a couple of coats of green paint over the entire thing and my wreath is ready to decorate.
 I add a bow made of some wire edged buffalo plaid ribbon and a piece of white chenille yarn as a hanger. I then dot on some Stickles glitter glue to add berries in both red and white. In full disclosure, if I make more of these wreathes, spray paint is definitely the way to go to paint them. Getting my foam paintbrush into all the nooks and crannies between the puzzle pieces was an exercise in patience. The basic assembly of these ornaments is quite fast and using spray paint would make them quite easy to mass produce.
I hope you enjoyed taking a little detour into the Christmas season for our blog post today. It's never too early to think about Christmas and while we're sweltering today, cooler weather will be here before we know it.
Rebecca here: Thank you to my mother for the fun Christmas in July blog! The puzzle wreaths are very nostalgic to me as I remember making some of those when I was little! Is everyone enjoying the heat or ready for winter? Let me know in the comments below! P.S. Today's photo on the homepage is from Pexels user Gary Spears: www.pexels.com/photo/close-up-of-christmas-decoration-hanging-on-tree-250177/
0 Comments
Hello everyone! Happy Sunday! I know it's been a minute since my last blog so it's lovely to be chatting with you all again. I don't have a big project to share today, but thought I would do a quick little blog about what I have been working on and what I'd like to work on in the future. A big reason as to why I haven't been in craft mode lately is that I've very much been in video games mode! I am a big fan of the game Stardew Valley which had an update recently so I've been spending a lot of time playing that. However, I do have a few crafty things up my sleeve! My biggest project I've been working on in the midst of game playing is a crocheted blanket using a fun variegated yarn. I won't say who it's for just in case they happen to read this, but I am reaching the final stages of this project:  I have also been spending some time consolidating my various yarn bits into some larger balls of yarn. I am looking to use up all of the end and smaller pieces I have left over from various projects to make some smaller baby/lap blankets for upcoming fairs. Here is an example of this project. I took my variety of pink/purple-toned yarns and cut them up in different lengths. I then attached all the pieces together one by one using a magic knot technique which involves overlapping the lengths of yarn, making two knots and then pulling them together. I always go ahead and make another knot or two over the "magic knot" as I'm slightly paranoid about the knots coming apart. I was able to make 2 decent balls of yarn with all these scraps.
 I'm excited to see how these turn out! I have some various ends of blue/green/brown yarn as well so I could do the same process if I like how it turns out with the pink/purple. I did make sure to only use yarns of similar weight. It would be very hard to make a cohesive project while using extremely thin and extremely thick yarn at once so I think a big key to making your own yarn ball is ensuring all the yarns are roughly the same size. Finally, something I have had in the back of my mind lately is finding something to do with the rest of the pole wrap I have from my IKEA upcycle last month.  If anyone has any bright ideas on how I could use this up, feel free to leave them in the comments below!
That's all she wrote for today. I'll talk to you all soon! - Rebecca P.S. Today's photo on the homepage is from Pexels user Anvi Jain: www.pexels.com/photo/close-up-photography-of-colorful-yarns-635002/ Happy Sunday everyone! I am back with part 2 of the IKEA cabinet upcycle we started last blog. I had shared my inspiration as well as the state the cabinet was in before I started. If you missed part 1, you can read it here: ikea-upcycle-part-1.html I started off by purchasing the pole wrap that I was going to use for the fluted wood effect. The pole wrap I bought was primarily MDF but had an oak veneer that could be stained. It could be bought in multiple sizes, but I bought a 4 by 4 foot piece as that is the size that would allow me to cut out my front panels each in one solid piece.
To cut in between the slats of the pole wrap, I was able to use a box cutter and it was very simple. The width of each door was 13 inches, but my piece ended up being a slightly smaller width due to the size of each slat. On the finished product, I don't think its too noticeable at all! To cut across the slats I used a hand saw and miter box. It ended up being a little harder to cut across the slats than I had originally thought, because of the thickness of the pole wrap when it was rolled onto itself. It took a few passes but eventually I made it through!
I ended up with a slightly jagged edge after the hand saw but I was able to clean it up with some sandpaper. I also ended up putting that edge at the bottom of the doors so it was less noticeable.  Then it was time to stain! I purchased this 2 in 1 stain and sealer in a color that matched some of the other wood tones in our living room. I ended up doing 2 coats of the stain and instead of just applying it to the veneer, I applied enough to let it sink into the MDF grooves so that everything was a cohesive color. The directions on the stain were to wait at least 6 hours in between each coat. I was impatient and did not wait that long and wished that I had. Although it ended up looking pretty good at the end, I do think the first coat went a little better and the second coat would have gone on smoother if I had waited the right amount of time!
After letting the panels dry overnight, I then used some construction adhesive to attach them to the doors. I do know that it would have likely been easier if I had removed the doors, but to be honest I was not 100% sure how the piece was assembled and I did not want to risk messing it up when I put it back together! I used a decent amount of glue and some clamps to keep things in place when they dried.  I purchased 2 sizes of the same simple black handle and ended up using the larger size as it felt better with the size of the doors. In part 1 of this blog, I know I had mentioned wanting to do colorful legs and handles on this piece but after thinking on it, my husband and I actually decided black would look better with all the other decor we had in the living room which is where this would end up going. To figure out where to drill for the handles, I dabbed a small amount of paint on the back of the handles and then placed them down in the correct spots. Then I had a perfect template for where the holes should go.
I bought some plain wood legs at Home Depot and used 2 coats of some black outdoor acrylic paint and 1 coat of sealer. Once they were dry, I added some furniture slidey pads that I attached with a dab of the same construction adhesive I had used before.
 I used the existing hardware that was already on the cabinet from the previous legs and also added a dab of construction adhesive before screwing the legs in to ensure they were very secure. Finally, I purchased some battery-operated strip lights to light up the inside of the cabinet. I attached them to the underside of the top of the cabinet and the underside of the shelf to light up each section. You will see how that looks in the final shots!  Before you see the finished project, I thought it would be helpful to share how much everything for this project cost, how much of each item I used and what I already had in my crafty stores and did not need to purchase. Pole Wrap - the 4 by 4 piece I bought was $108; I used less than half of the piece I bought and do have a lot left to do something else with; I had purchased this size specifically to allow me to cut the door pieces out in one piece Gorilla Glue Construction Adhesive - $10 and I still have a good amount left Wood Stain - $13 and I do have some left of this as well Battery operated light strips - $30 2 door handles - $12 4 cabinet legs - $44 In terms of what I already had and used for this project, I used a miter box/saw, paintbrushes, clamps and drill. And after all that suspense, I am finally ready to show you the final project. We ended up turning this cabinet into our bar cart/cook book storage.
 I am so happy with how this turned out! I had quite a journey with this cabinet from thinking we would just end up throwing it away to turning it into this!
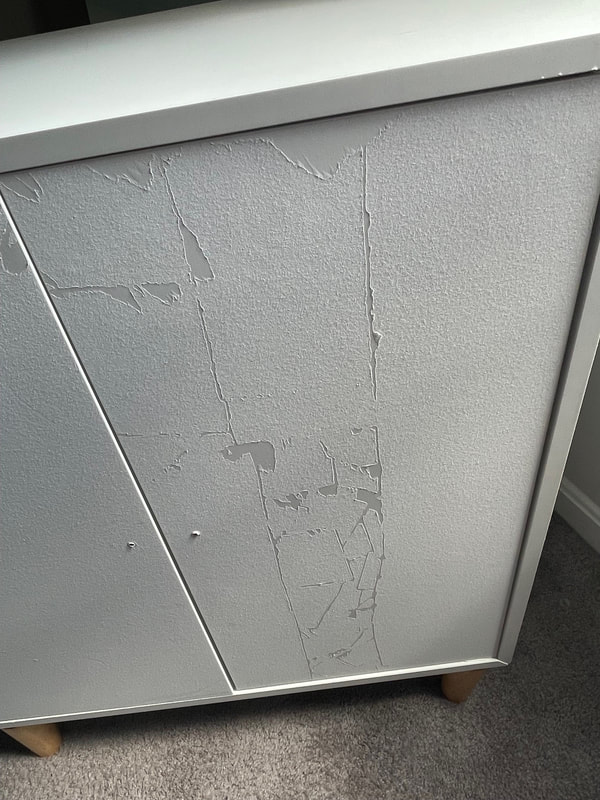
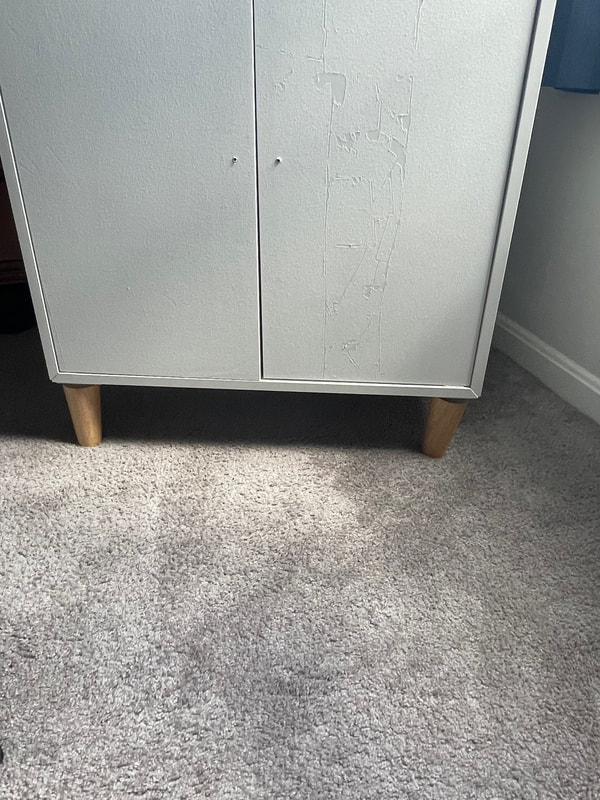
I'm really glad that I decided to upcycle it into something that worked well for us and fit the style of our living room. Let me know what you all think about it in the comments below! - Rebecca P.S. Today's photo on the homepage is from Pexels user Chris F: www.pexels.com/photo/assorted-wine-bottles-1283219/ Hello everyone! Happy Sunday and Happy Mother's Day (in the US at least) to all the mothers out there! Today I wanted to share a quick introduction to a project that I am going to be embarking on over the next few weeks. I have a simple IKEA cabinet that I plan to DIY and upcycle into something nice! So here is the cabinet in question. This is what is looked like a few weeks ago:  I got this cabinet from my parents and put it in my craft room/office for a while. It is just a white particle board cabinet and I added the peel and stick wallpaper and gold knobs to the front of the doors. Recently I rearranged the room this piece was in and there was not a good spot for it anymore. I removed the knobs and peeled off the wallpaper, thinking I would be left with a nice clean slate, but that was not quite the case. I should have used heat when removing the wallpaper because just pulling it off actually ripped off the top layer of the particle board as well.
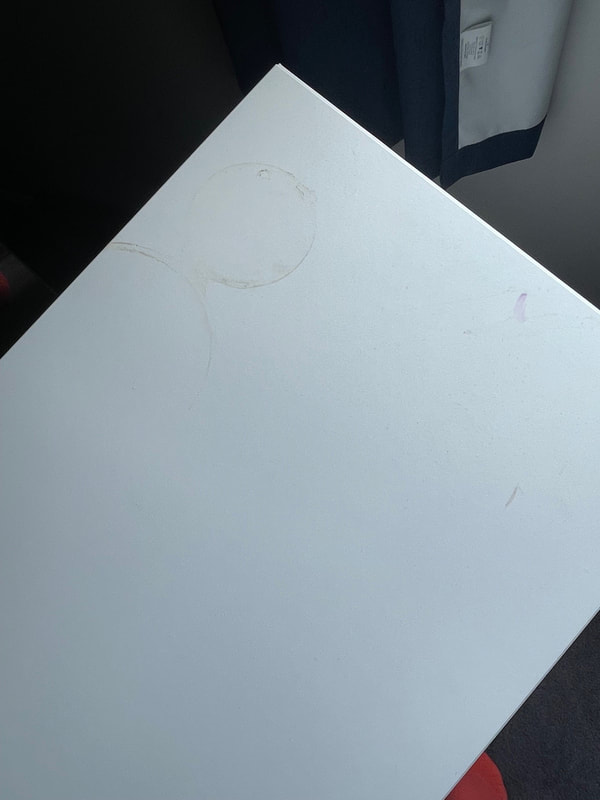
The cabinet also has a leg that's a bit wonky and caving in as well as some stains on the top.
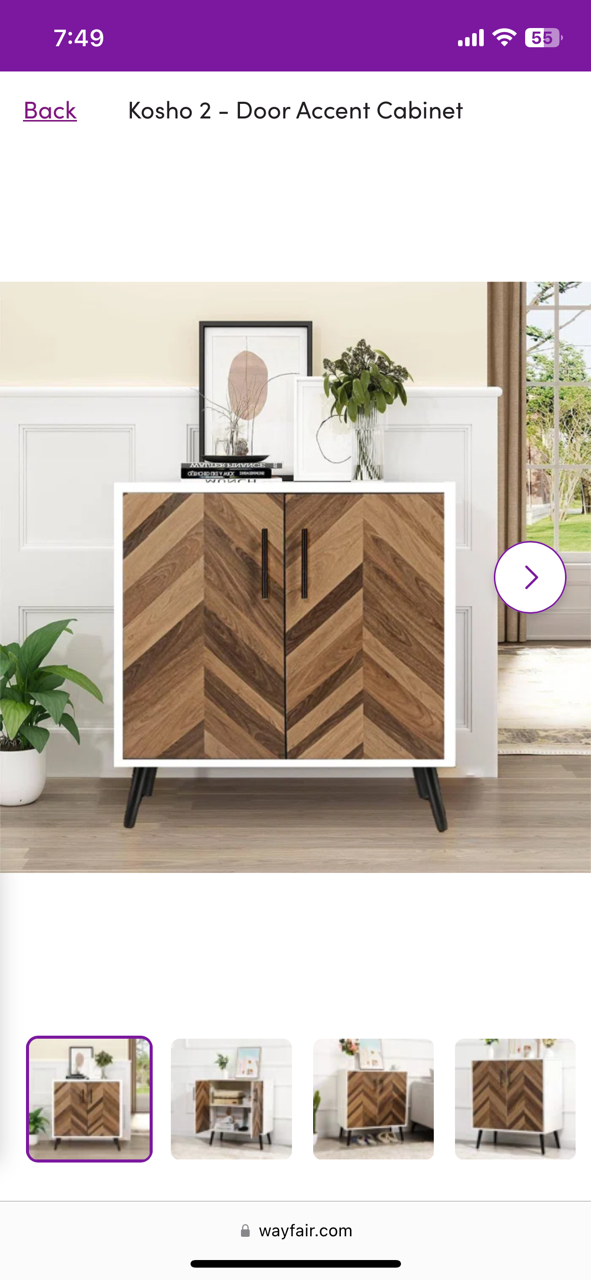
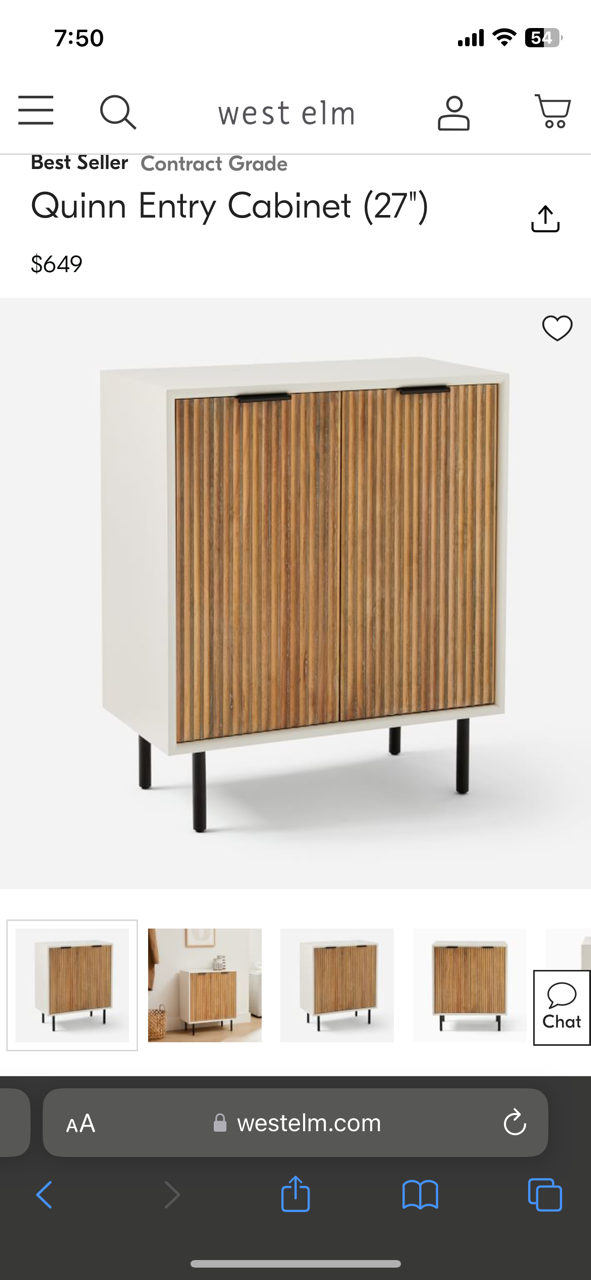
Originally my husband and I were just going to bring the piece to the dump, but the longer I stared at it the more I felt that I could make it into something cute. It also felt wrong to dispose of something that, although it has a few flaws, is still a fairly sturdy piece of furniture. So I got to googling and found a few inspiration pictures. The general vibe I will be going for is a decorative wood feature of some sort on the doors while leaving the base of the piece white. These are some cabinets I found online that fit the general idea I'm going for.
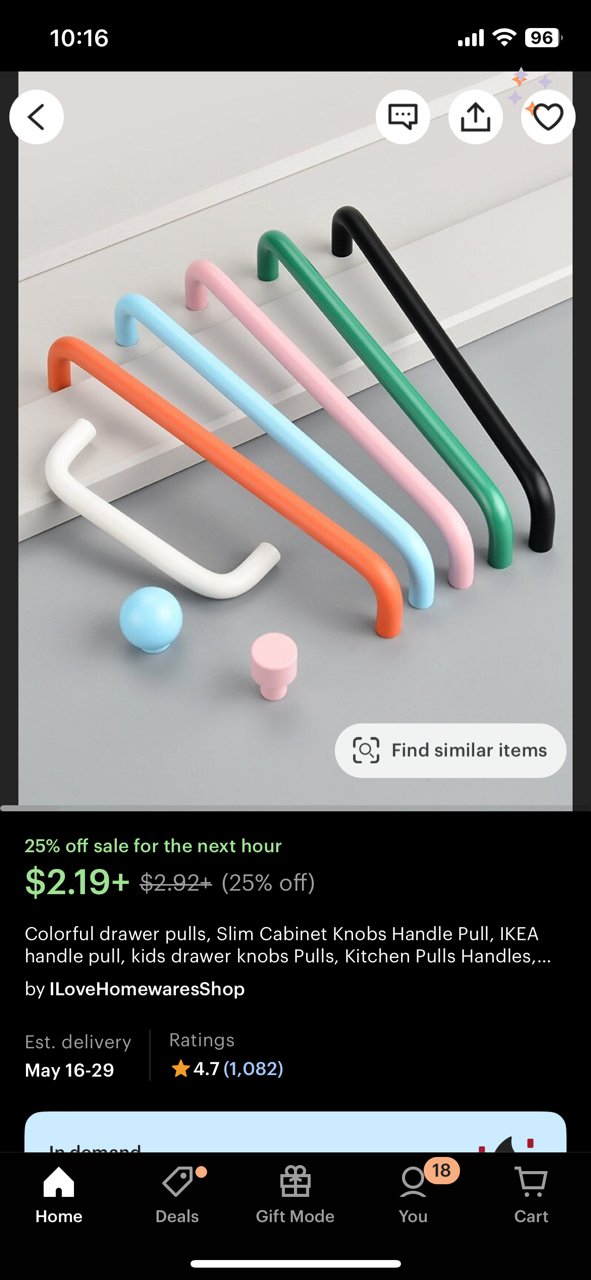
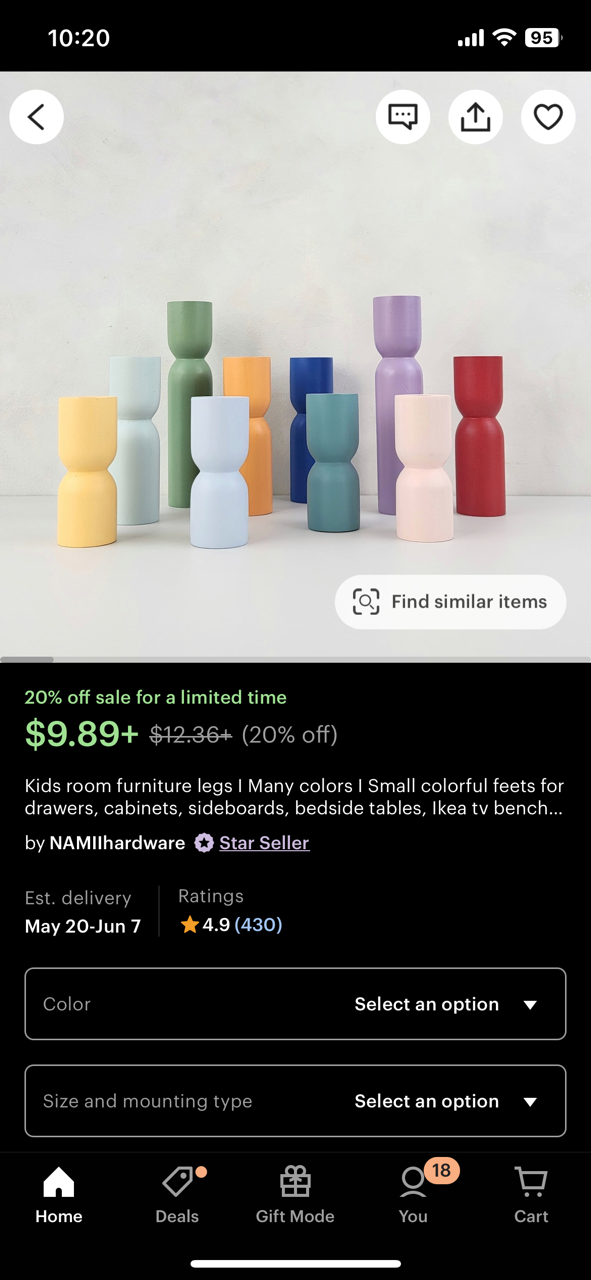
I'm personally a little more drawn to the West Elm one on the right as I'm intrigued by the fluted wood look. I follow several DIY Youtubers who have used a product called pole wrap to achieve the fluted look in an easier way. It is essentially wood or MDF on a backing that is intended to be wrapped around a pole in a house to make it more aesthetic but could also be applied as a flat piece. I have never used this product before so I think I would like to give it a try. I would certainly not need 96 inches of it as shown in the picture though!  I would also like to deviate from my inspiration pictures a little bit as well and add some color to the handles and feet as opposed to a wood or metal look. These are some feet and handles I found on Etsy that are speaking to me. They might not be exactly what I end up going for, but this is the direction I would like to take I think.
That's all I have today but I wanted to show you guys the beginning mood board stages of this project I'm excited to start! I'm not sure if I will need one or two more parts for this project, but there will certainly be more to come. Let me know what you think about my plans for the cabinet in the comments below!
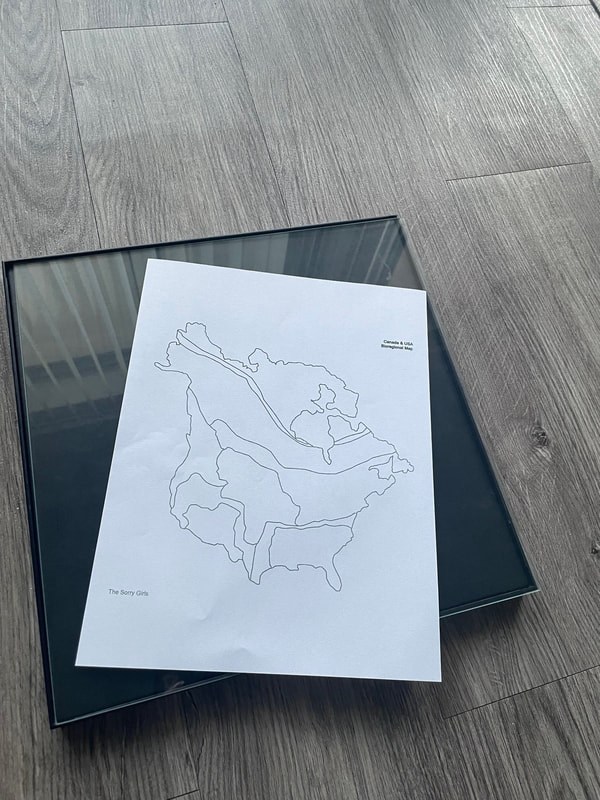
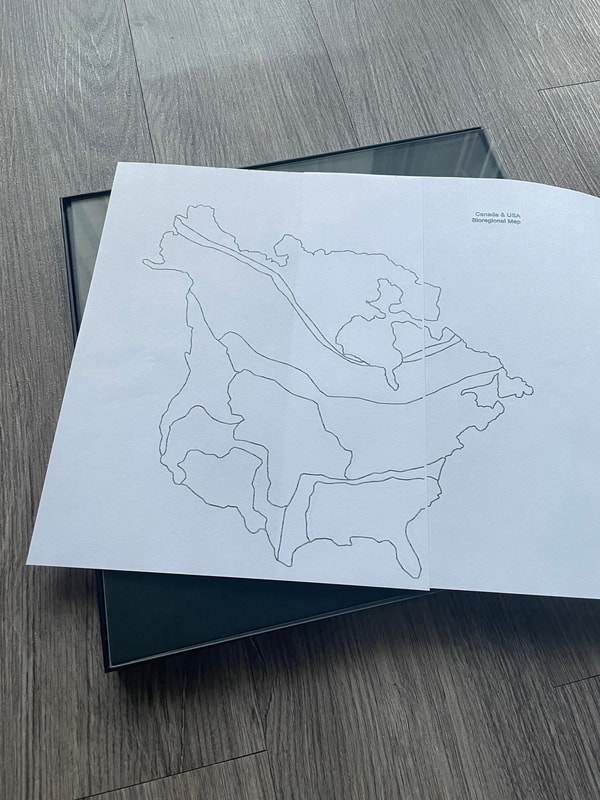
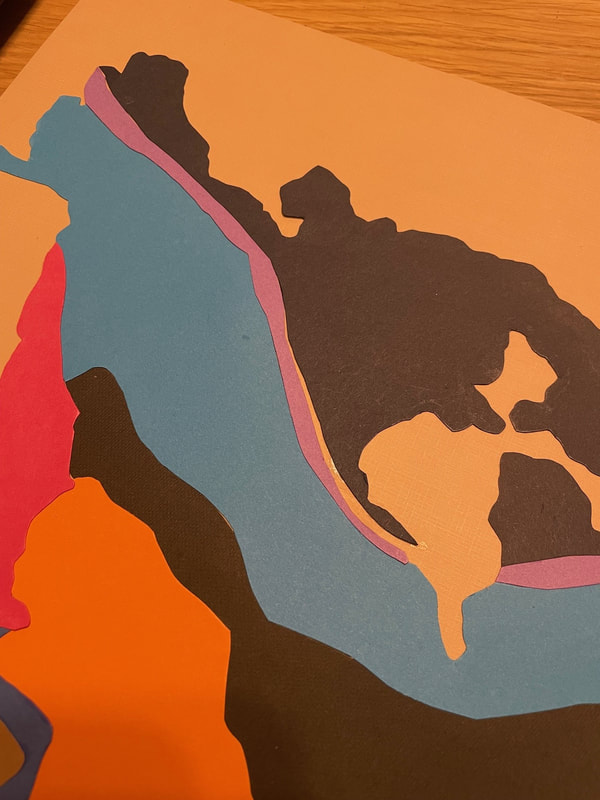
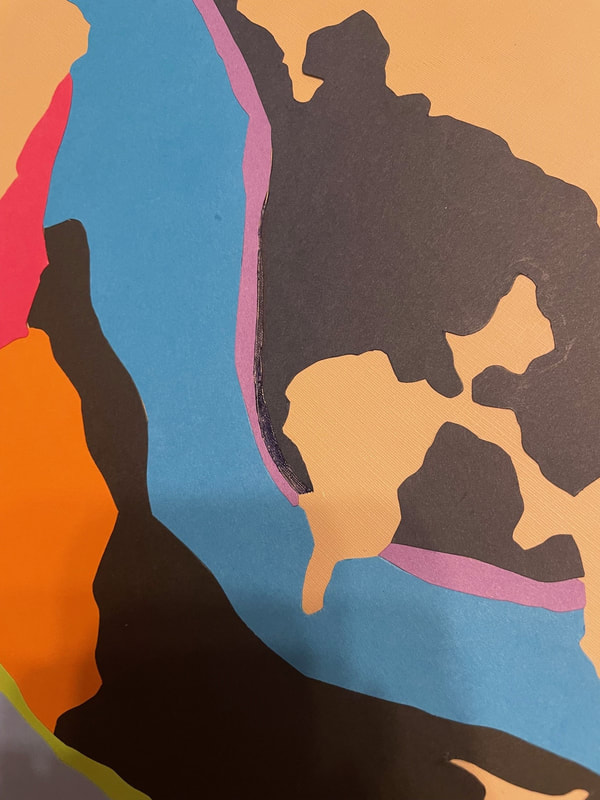
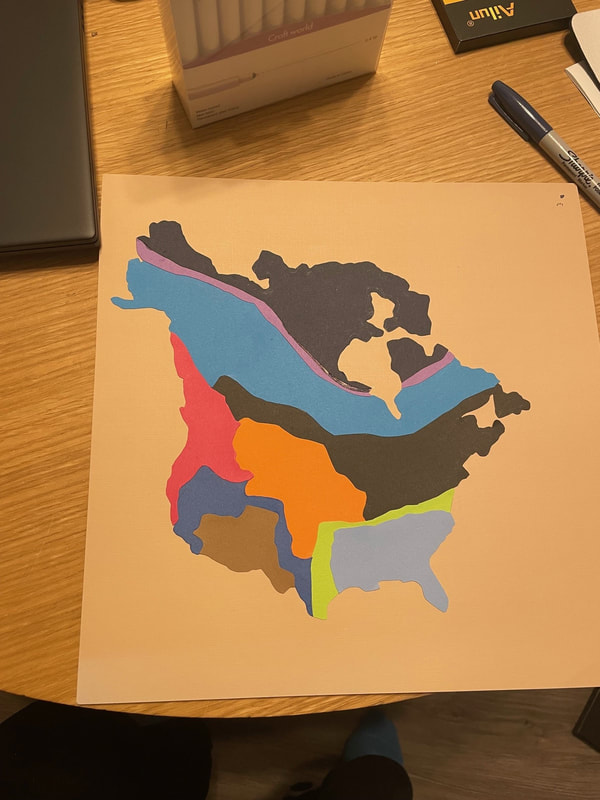
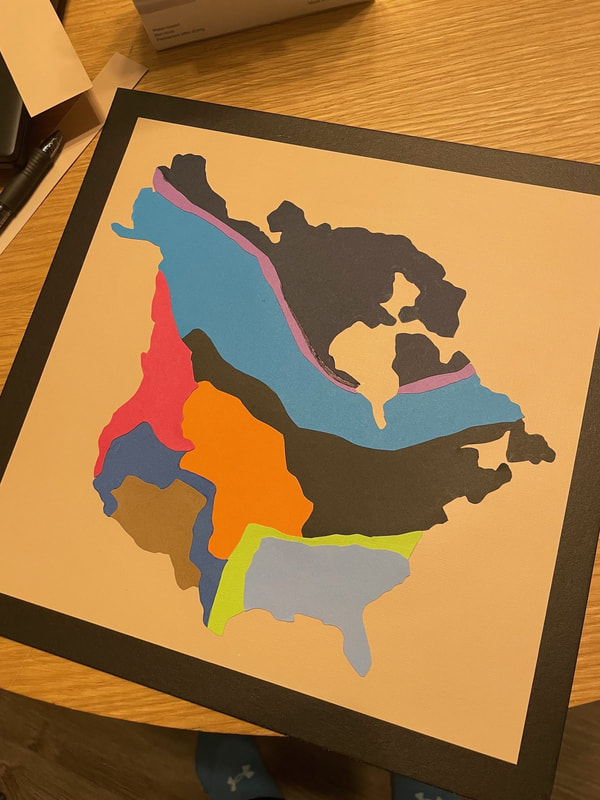
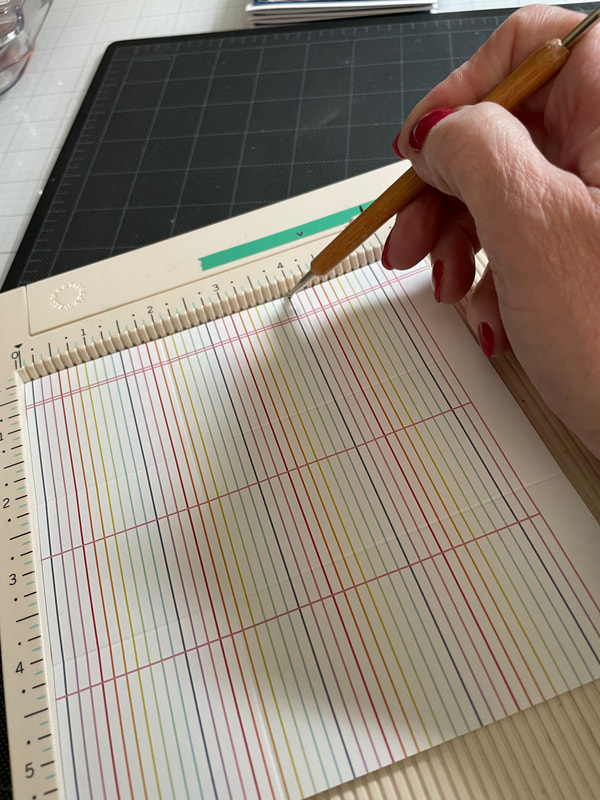
- Rebecca P.S. Today's photo on the homepage is from Pexels user Alexander Isreb: www.pexels.com/photo/ikea-building-1797405/ Hello everyone and happy Sunday! Today I am here with a fun and simple craft I made yesterday. I subscribe to a YouTube Channel called The Sorry Girls and in a recent video, one of the women on the channel made a very cool wall tapestry featuring a map of the United States and Canada. Here is a link to the video so that you can see her project: www.youtube.com/watch?v=omZdgDXREKA The map template that she used was a simplified map of the 2 countries that focused on the different bioregions as opposed to being divided by states or provinces. As I mentioned, the map is very simplified so it does not include Hawaii or the many islands of Canada. I think those would have just been too small and intricate to include in the pattern! The pattern used by the channel is available for purchase and download on their blog for only one dollar so I purchased it and decided to try my own take. If you're interested in the template yourself, you should be able to find it via the YouTube video link I shared above. I decided that I wanted to make my version out of paper rather than fabric and wanted it to fit inside a 12 by 12 frame. I originally printed out the template on a normal sheet of printer paper but felt it was too small so then printed it out across 2 pieces of paper which worked out much better.
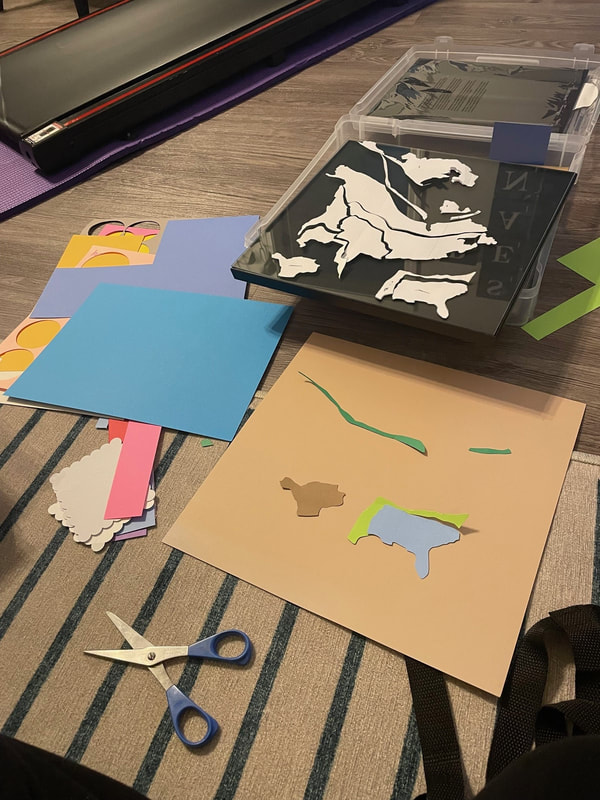
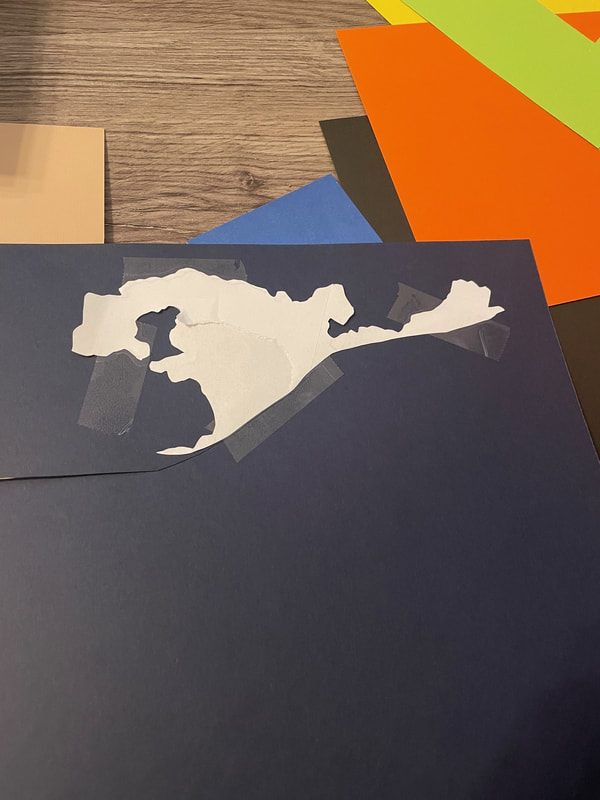
I then cut out all of the different sections of the template. The ones you see that are marked as 1 and 2 were just a reminder to myself that although these pieces did not connect, they would need to be the same color. 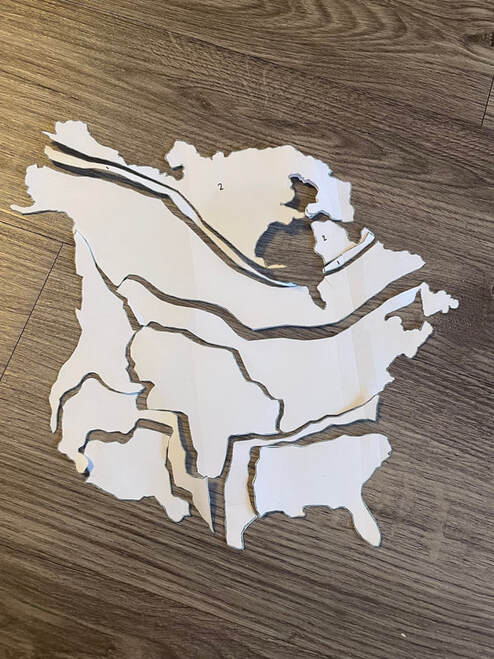 I then pulled out my colored cardstock and started deciding what color I wanted all the pieces to be. I went for a sandy tan color as the background and initially thought I would use just blues and greens for the different sections of the map, but pivoted and added some brighter colors in as well. I started out by just trying to hold the white paper template pieces against the cardstock as I cut around them but that was way more complicated than it needed to be. I realized about halfway through that it made much more sense to tape the white piece to the cardstock so it was firmly in place, cut it out and then gently remove the tape.
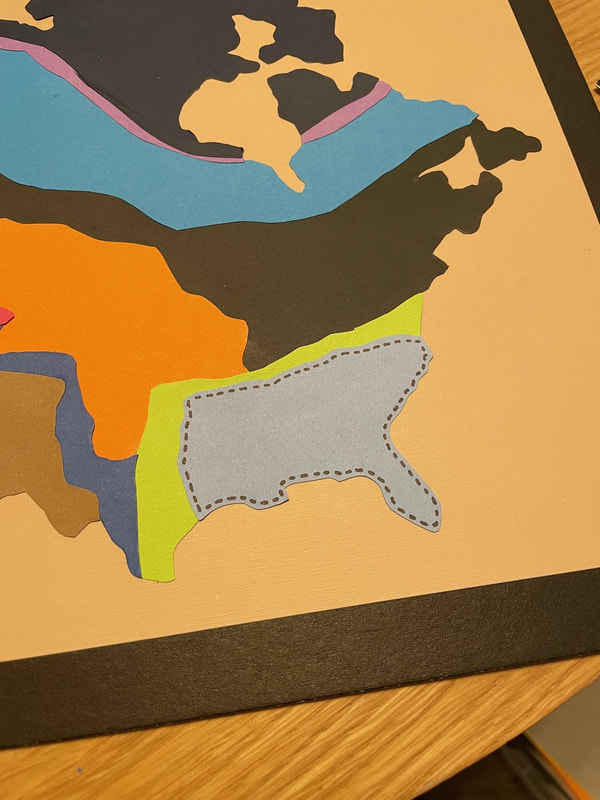
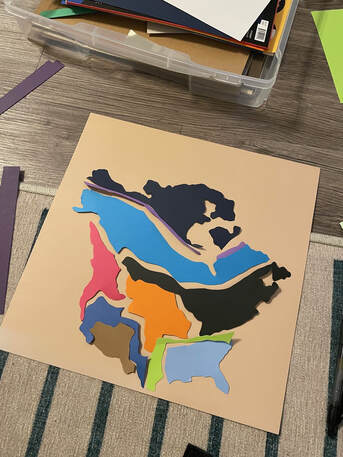 Once I got all the pieces cut out it was time to glue them down to the tan base. I used a liquid glue that is nice and strong but allowed me a few seconds of wiggle room if I needed to reposition anything. I did fairly well lining everything up until the last piece which ended up having a sizable gap that should not have been there. I started by just coloring in the gap with a matching marker color but the difference in texture and sheen was really bothering me.
I finally decided it would just be better to cut out a tiny sliver of the appropriate paper color and glue it down into the gap. It's not perfect, but I do think it ended up looking better than the marker did!
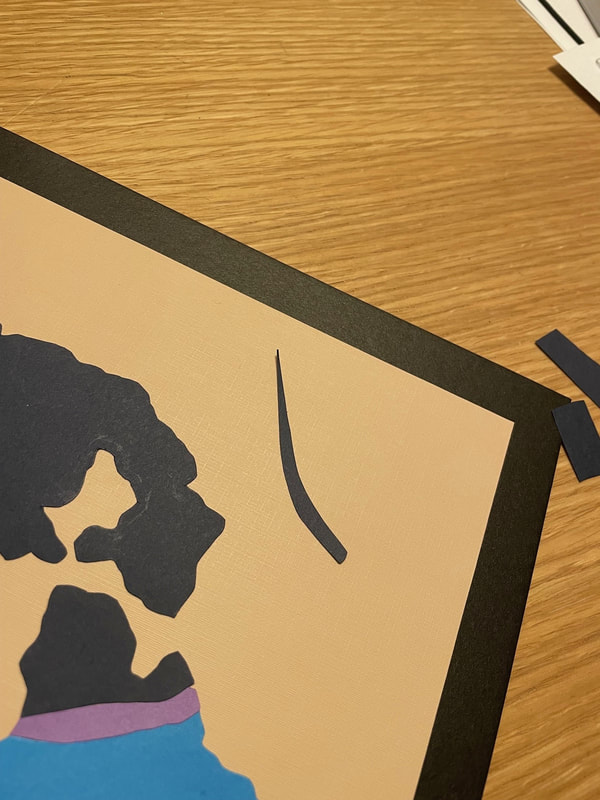
I also tried my best to line everything up so the map would be centered on the tan paper, but once that first piece is stuck down there's really no going back. The finished piece was not as centered as I would have liked so I actually ended up cutting down the sides of the tan paper. I cut varying lengths off of each side to get the map more centered but made sure that the amount I cut off the top and bottom combined and the two sides combined both equaled 1.5 inches so there would be a nice border all the way around. The backing board of the frame was black, so this actually worked out well to look like a picture mat.
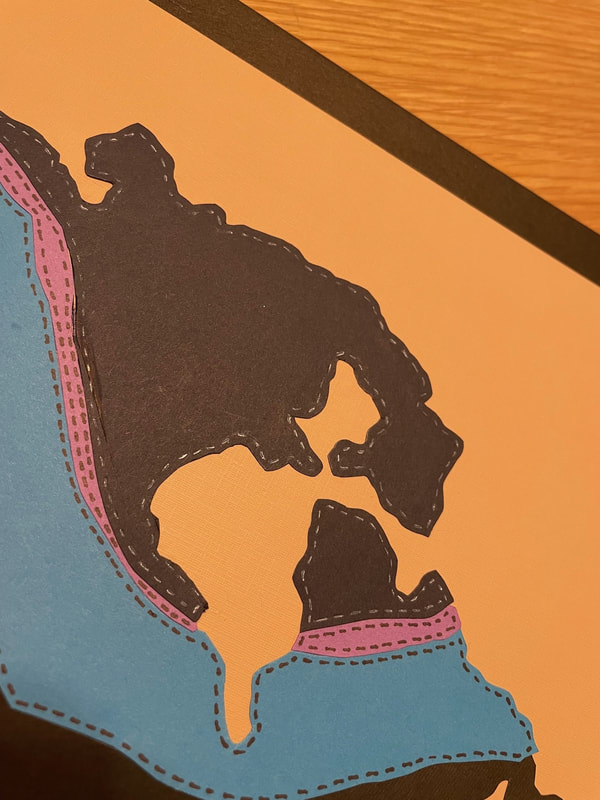
I then felt like it needed some additional detail. The original craft done by The Sorry Girls was a sewn tapestry as I mentioned so I thought it would add some interest to draw on some stitch lines on each piece of the map. I used black on all of the lighter colored pieces and a white gel pen on the black and navy-blue pieces.
I then popped the piece into a frame and it was good to go! It now lives as part of a gallery wall I have behind me when I'm sitting at my work desk. 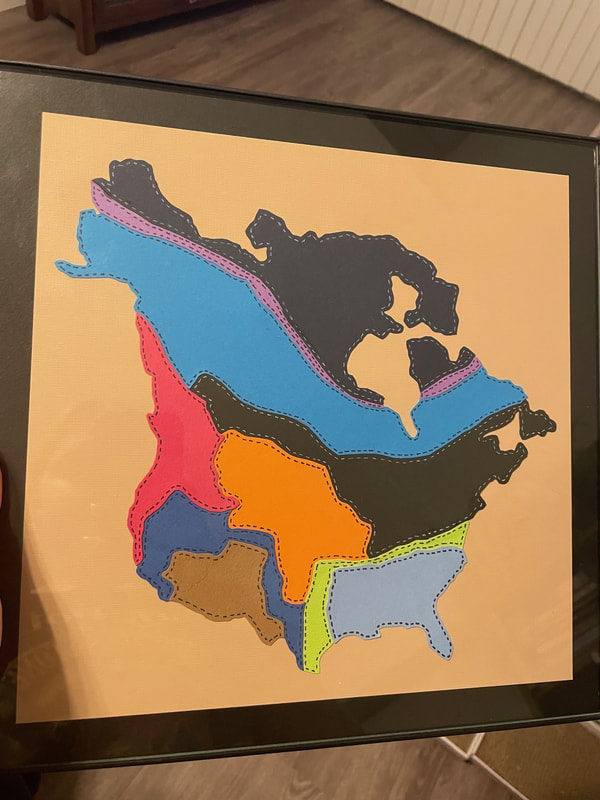 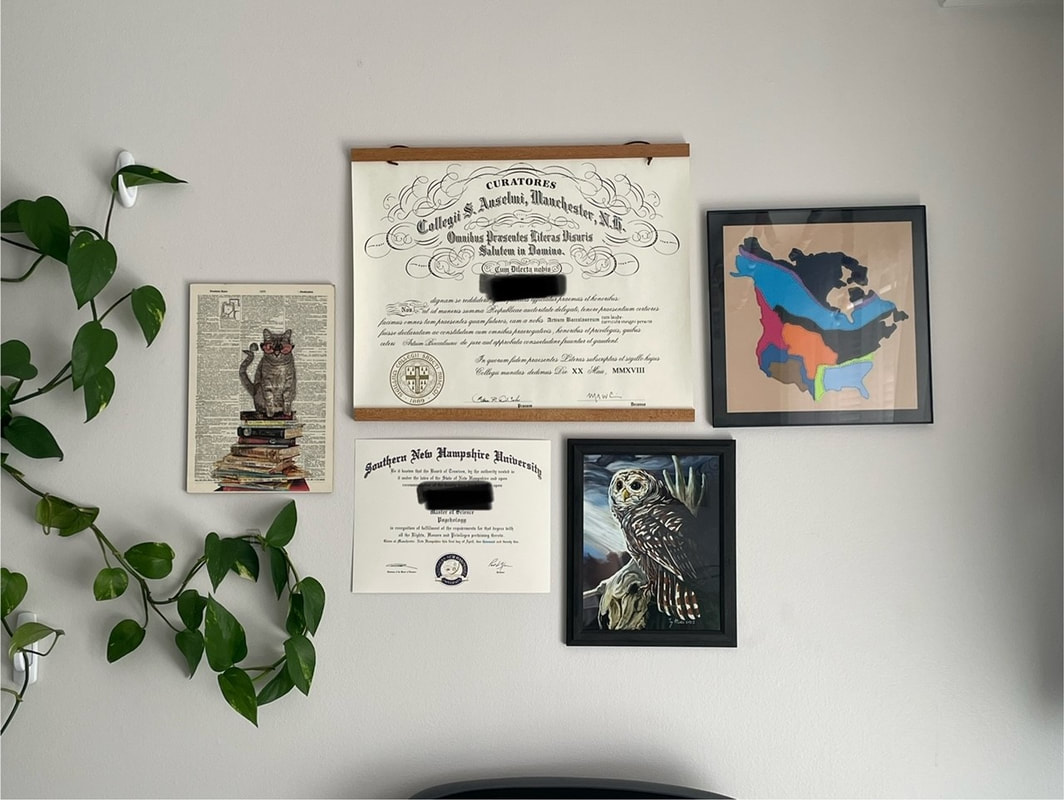 I was feeling like doing something crafty but also low stakes and this was a great way to spend an evening! I got everything done in a few hours and felt like it satiated my desire to make something. Let me know what you all think in the comments below!
- Rebecca P.S. Today's photo on the homepage is from Pexels user Andrew Neel: www.pexels.com/photo/assorted-map-pieces-2859169/ Hello everyone and happy Sunday!
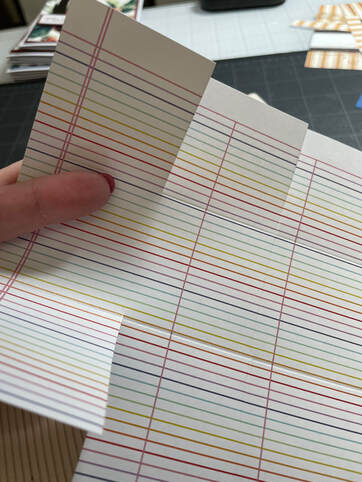
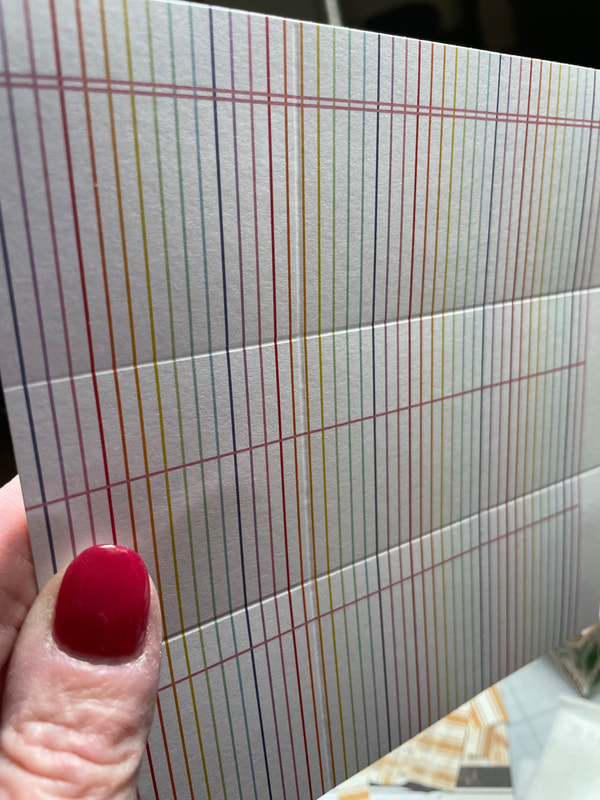
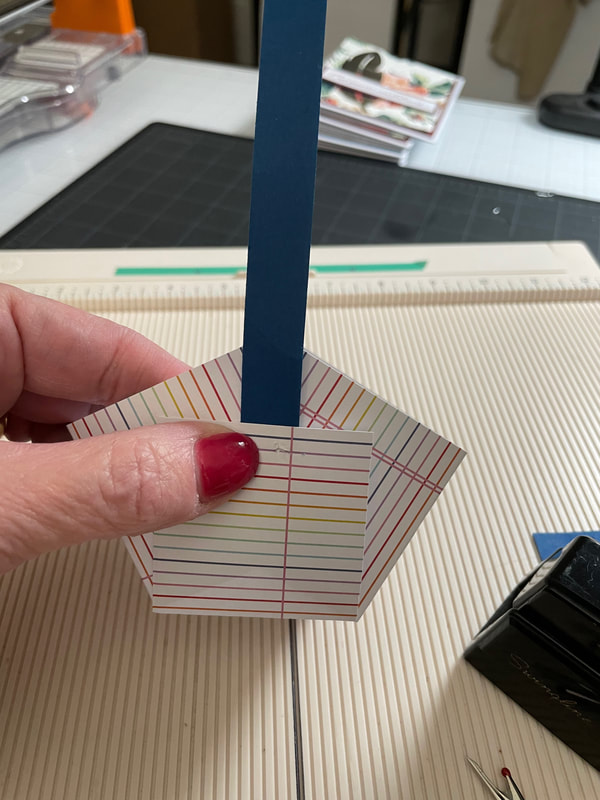
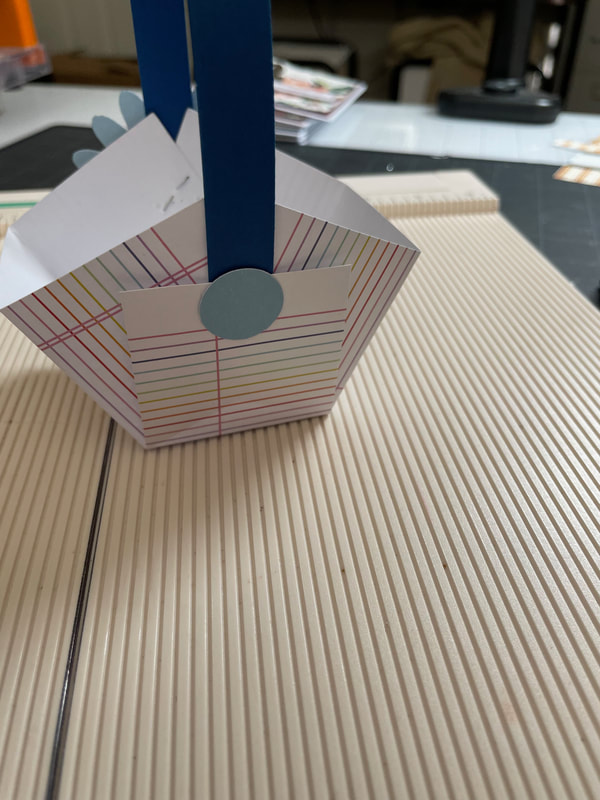
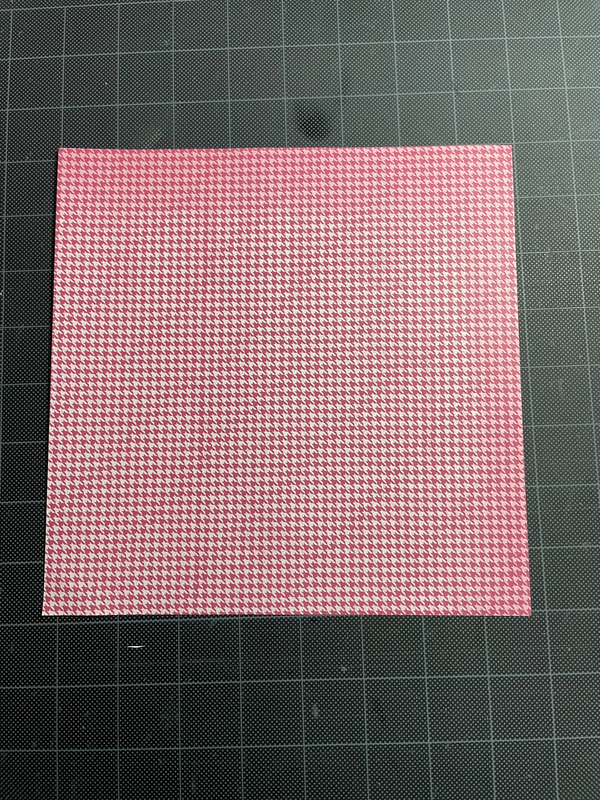
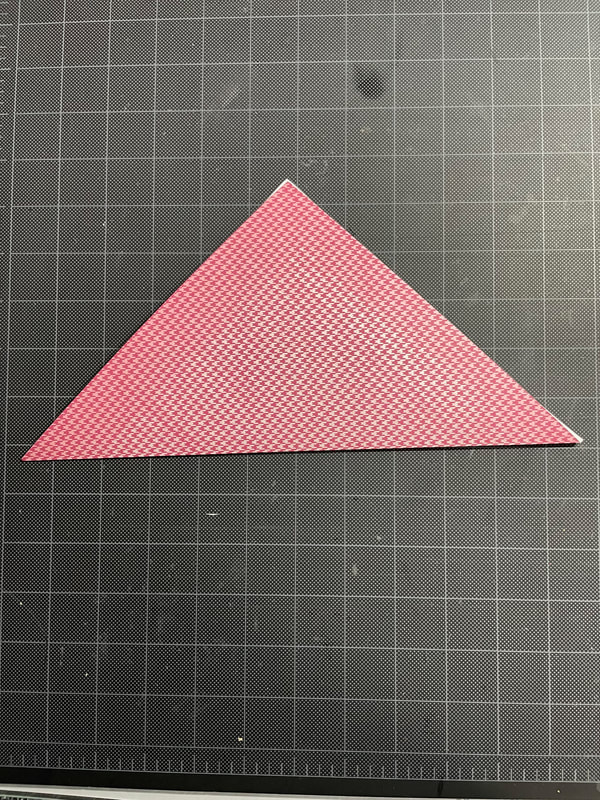
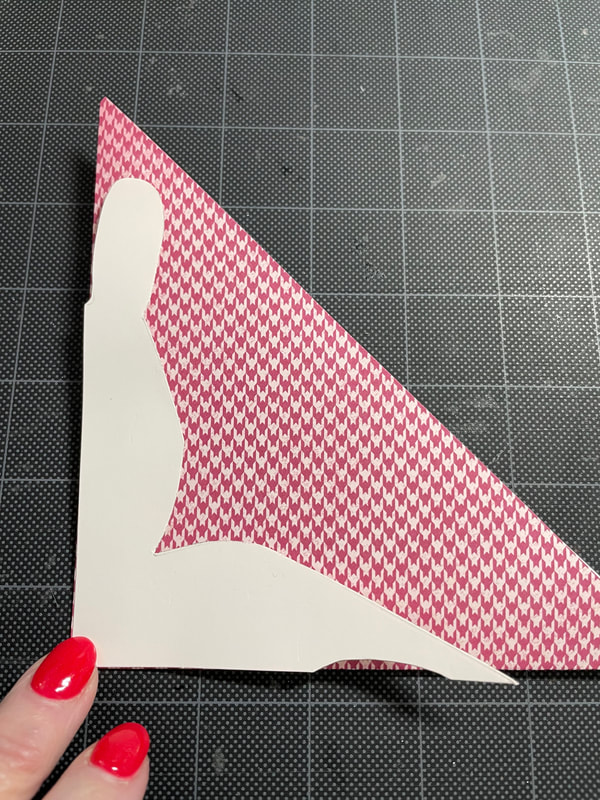
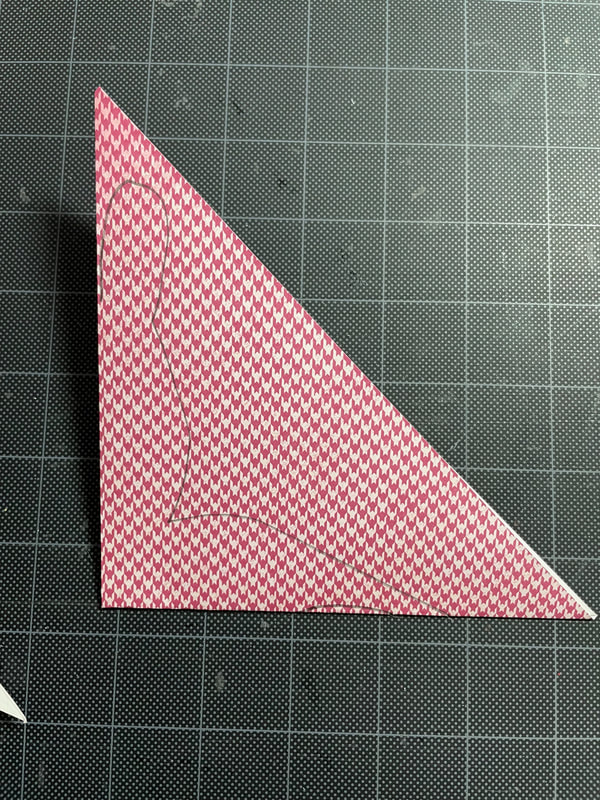
Today I wanted to take some time and shout out some small businesses/Etsy shops I have purchased things from recently. We live in a world where its virtually impossible to buy "small" for every purchase we make, but I love to try to when I can. Be sure to give some of these artists a look if you are interested! First off I wanted to shout out somebody who I have shouted out before, September Sun Studio. Cara is a lovely artist and created my paintbrush logo that you see on the blog homepage and my socials. I have bought stickers and pet portraits from her and they never disappoint! She also donates some proceeds from her sales to various causes that are meaningful to her. You can find her Etsy shop here: www.etsy.com/shop/SeptemberSunStudio Next I wanted to shout out an Etsy shop I recently bought something from, JandT3DCreations. This one was a little out of left field for me and not a shop I might normally go searching for as they do a variety of 3D printed things. However, I recently was looking for something kind of niche, a small plastic trashcan or dumpster. My husband uses contacts and I wanted a silly little thing that could sit on his bedside table for him to dispose of his contacts in and stumbled upon this shop. I ended up purchasing a little green dumpster and its adorable! Here is their link: www.etsy.com/shop/JandT3DCreations As you all know, I have been really into crocheting lately and have purchased crochet patterns from many shops. Here are some links to shops whose patterns I have purchased: www.etsy.com/shop/SmallBeanCraftStudio www.etsy.com/shop/KristinaaCreates www.etsy.com/shop/StitchenGiggles www.etsy.com/shop/WildSunflowerCreate As I have talked about on the blog before, I go through phases with my nails. Sometimes I want to paint them myself, sometimes I want to make my own press on nails and sometimes I just want to buy press on nails created by someone else. Here is the shop I frequent most often when I'm looking to purchase handmade press on nails. I have found their nails to be high quality, but also not as expensive as others I've seen on Etsy. www.etsy.com/shop/2SisterNails I also wanted to share a few people who were not on Etsy and I actually found on Instagram. I always like finding fun art prints for my office/craftroom gallery wall and have purchased art from both of these artists. One goes by @evergreenqveen on Instagram and the 3 prints I bought from them were about Animal Crossing, Stardew Valley and then just a cute little witchy kitchen scene. Here is their link to buy art prints: www.inprnt.com/gallery/evergreenqveen/ I also just bought some prints from @amina.illustration on Instagram. I bought 2 of their overgrown planty art pieces and I really love them. Here is the link to their shop: aminaillustration.com/shop That is not an extensive list of people I have purchased from recently, but they are some of my favorites for sure. If you are looking for something unique for yourself or someone else, don't forget to try checking out a small business. I know it's not always as accessible or affordable as buying something from a department store or large retailer and often people will try to make others feel bad if they are unable to support a smaller business. I don't want to make anyone feel that way! I just thought this would be a fun reminder and shout-out to some cool creators that I have seen recently who I think are worth a look. Have a great weekend everyone, talk to you all soon! - Rebecca P.S. Today's photo on the homepage is from Pexels user Eva Bronzini: www.pexels.com/photo/support-small-business-text-on-a-white-surface-7661138/ Hello Friends – It’s Suzanne, Rebecca’s mama, happy to be back with you on the PPP to share three quick and easy paper crafts that will be perfect to either decorate your Easter table or send to school for a classroom treat. First is a cute little basket. For this basket, you’ll need a square piece of paper that is sized to be divisible by three – 3 X 3, 4.5 X 4.5 or 6 X 6 inches is a perfect size for a mini basket or 9 X 9 or 12 x 12 inches would give you plenty of room for larger treats. The basket I am making in these photos starts with a 6 X 6 inch piece of paper. To begin, either fold or score in both directions to create 9 equally sized squares. Then, cut up on the score lines on each side of the paper, up to the opposite score line. Your paper should remain in one piece, with four cuts all lined up in the same direction.
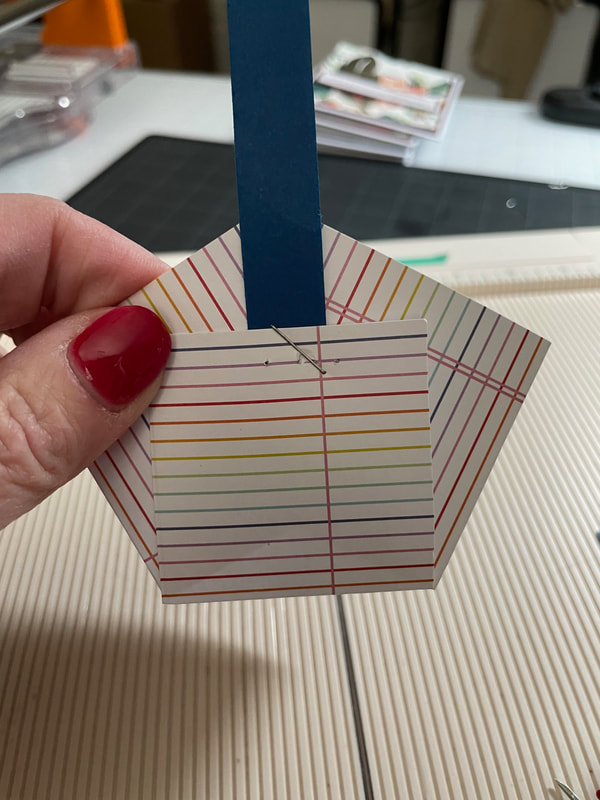
 Refold all your score lines and use your fingernail or a bone folder to make sure the folds are sharp. Be sure that the pattern is to the outside of the folds. 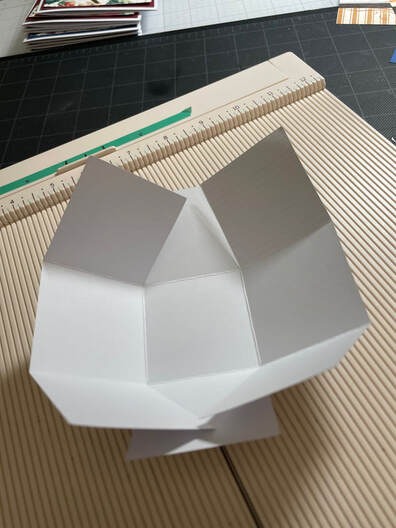 Bring the two side pieces up behind the center flat , overlapping the points as high as you wish, but not completely vertical. Tuck a thin strip of paper in between and staple the side in place. Repeat on the other side.
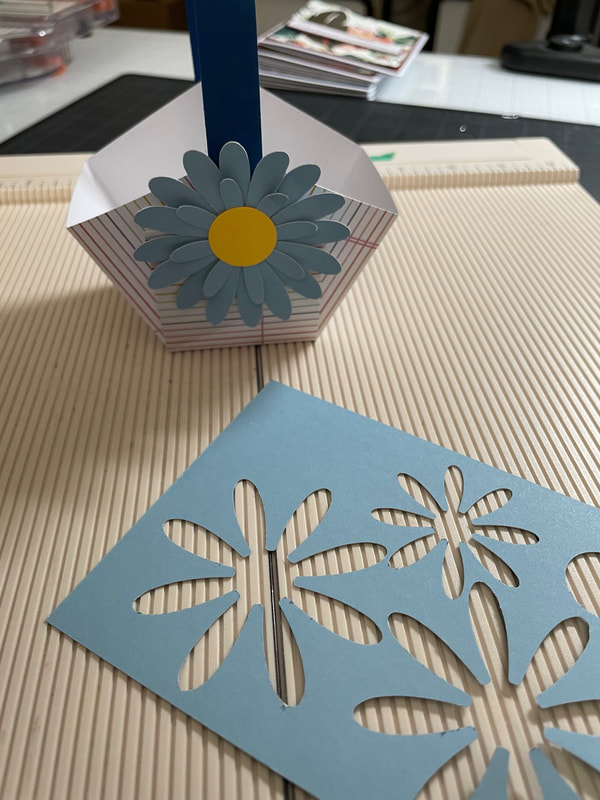
With that, your basket is done. You can decorate it as simply or as much as you wish. For this one, I punched out a few daisy shapes, layered them onto each other and used a glue dot to hold them in place, covering the staple. For the back of the basket, I punched a simple circle to hide the staple.
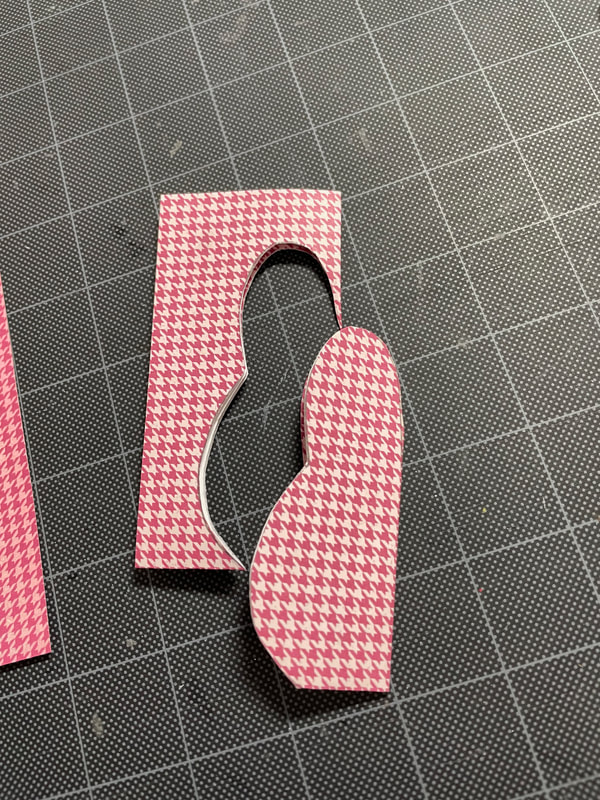
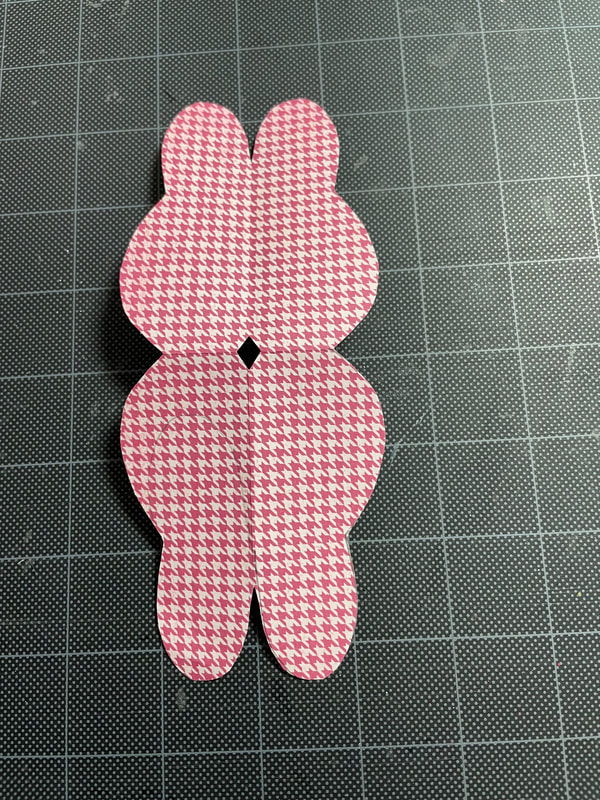
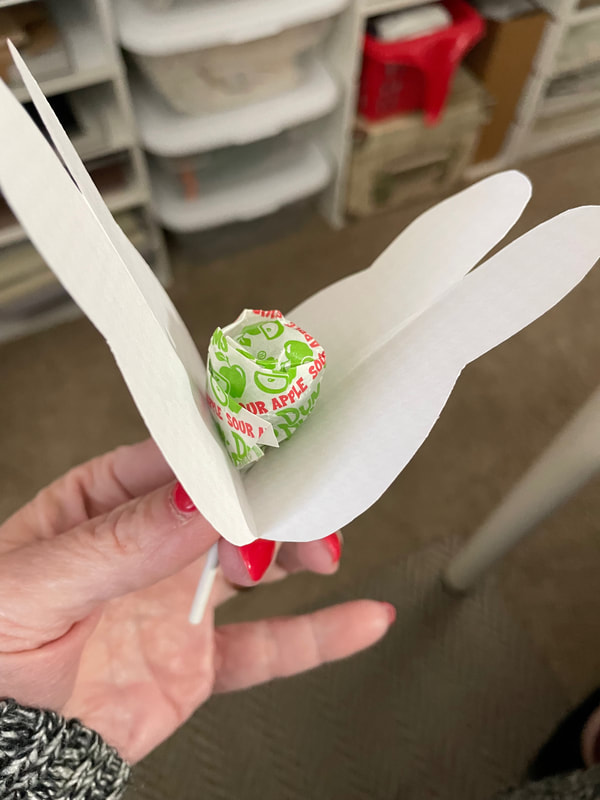
To finish, I stamped a small Easter sentiment and tied that on with a piece of cotton thread. You can see that basket can hold a fair amount. I made another with a 3 X 3 inch piece of paper and ended up with a teeny tiny basket that would be large enough for a few chocolate eggs or jelly beans. For this one, I just punched a couple of small circles to cover the staples. These will be the perfect size to use as place cards for Easter dinner. 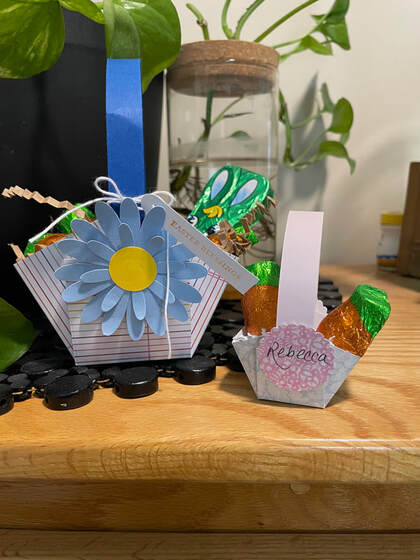 Next up is a quick and easy lollipop cover. You will want to start with a piece of paper this is roughly three times as wide as your lollipop and about twice the length of the overall lollipop (including the stick). For these Dum-Dums, I started with a piece of paper 4 inches wide and 8 inches long. Fold the paper into fourths and draw one ear and one half a face against the folds of your paper. I made myself a small template, which would be helpful to keep your pop covers the same size, if you were making a number of these. Your lollipop should be able to fit comfortably in the head of your bunny. 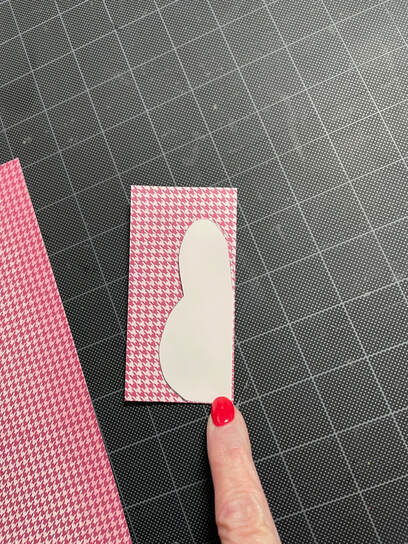 Cut the shape out and clip a tiny corner off the point (to make a hole for the stick of your lollipop.
Pop the stick through the hole and use a tiny bit of adhesive to hold the ears together. You can decorate these as elaborately as you wish as well. I decided to just add some eyelashes and a small bow, but you could add a nose, whiskers, flowers, etc. This would be great as a quick and easy classroom treat and since most kids will simply tear the covering off to get to the candy, I would chose to go simple with the decorations.
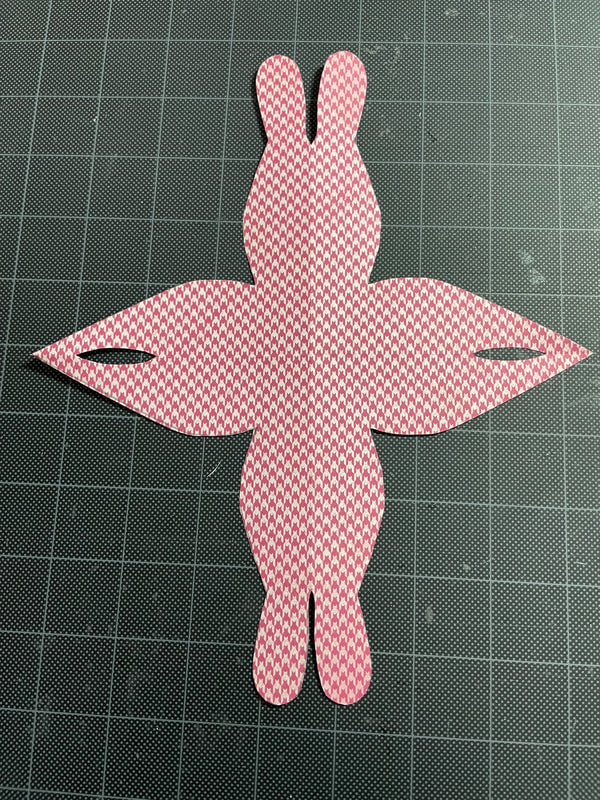
The last item is a small three dimensional box just large enough to hold a Ferrero Roche or a Lindt ball. For this one, start with an 8 X 8 inch piece of paper, folded corner to corner in both directions.
The shape for this one will be one ear, half a face and a longish body with a little slit in the end of the body. This should be drawn with the corner of the shape in the folded corner of the paper.
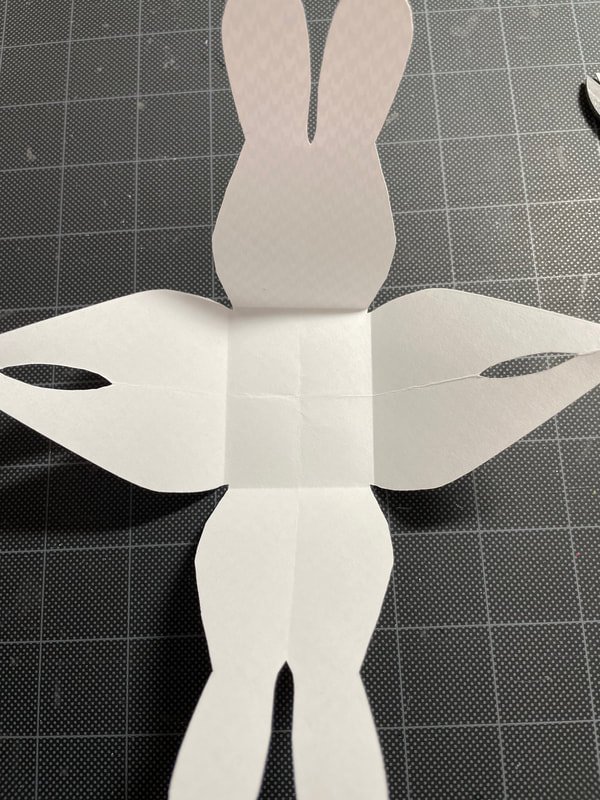
Fold up each side of the resulting shape to create a flat bottom to your candy holder.
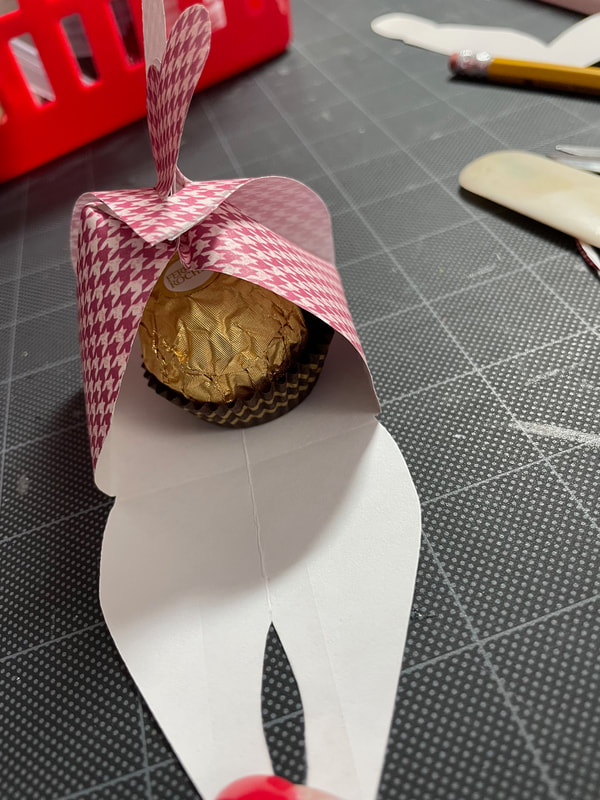
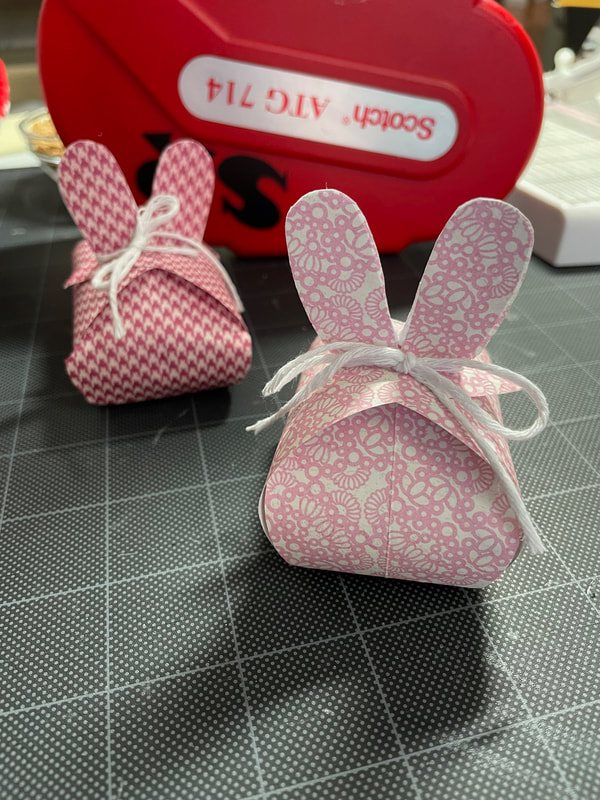
Bring the four bunny ears together and push them through one of the slits at the end of the body portion. 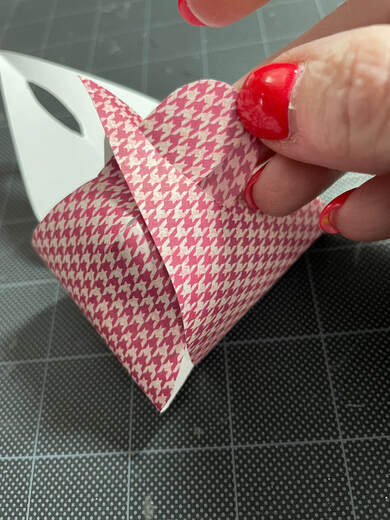 Pop your candy into the body and then push the other slit over the ears, closing the box. You can use a pencil or your bone folder to push the sides of the box out to ensure the shape is rounded. Here again you can chose to decorate as much or as little as you wish. I like the simple bow on these boxes.
I wish you all a happy Spring and a happy Easter. And, of course, happy Crafting!
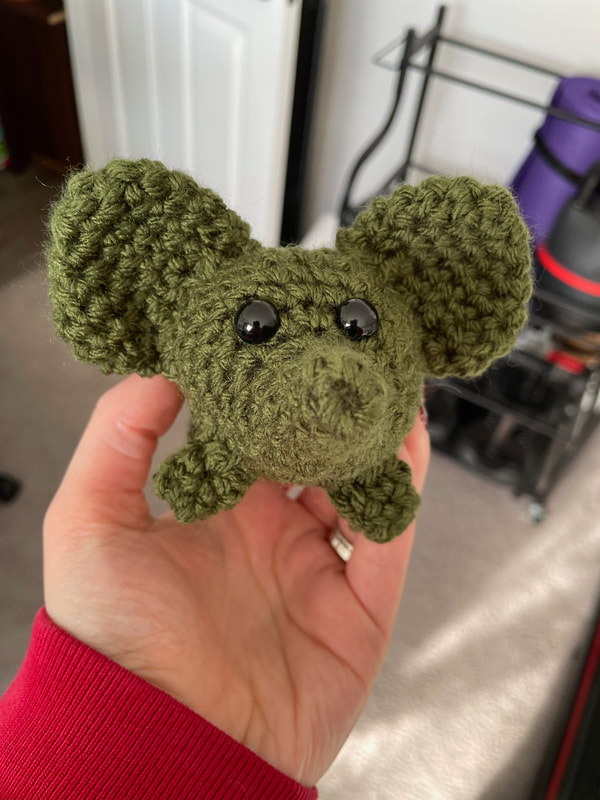
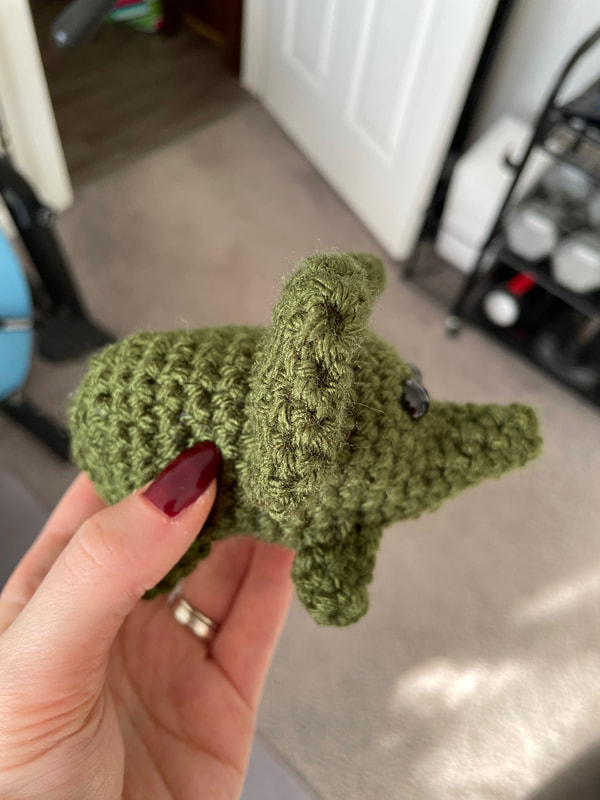
Thanks to my mother for a fun and springy blog! - Rebecca P.S. Today's photo on the homepage is from Pexels user George Dolgikh: www.pexels.com/search/easter/ Happy Sunday everyone! I hope you are all doing well. Today I wanted to share my initial experiences trying amigurumi, which is a Japanese style of crocheting small stuffed animals or creatures. I have been getting pretty comfortable crocheting flat pieces and have been wanting to try my hand at some more complicated patterns. My best friend got me a Harry Potter crochet kit and book for Christmas that I was very excited to dive into, but found that it was a bit too advanced for my skill level at the time. Recently, my husband bought me a Woobles beginner crochet kit, also of Harry Potter, and I feel like that kit really helped the pieces fit together for me in terms of crocheting in the round and crocheting 3D pieces. Here is my little Harry Potter I made with that kit! 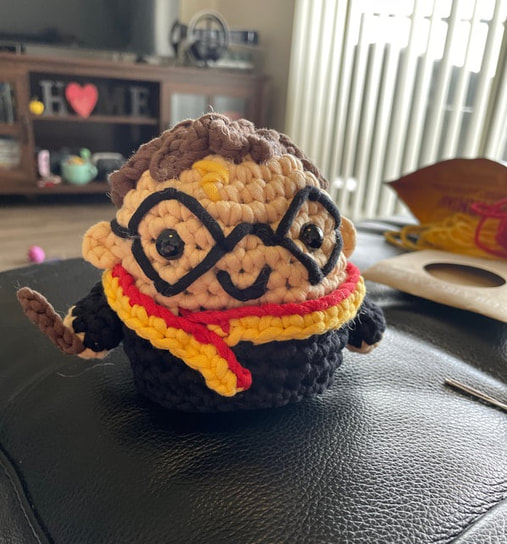 I feel like when I go back to the Harry Potter book my best friend gave me, I will now be much better equipped to take it on! After completing the Harry Potter Woobles kit, the next project I embarked on was some small animals. I have a friend who is pregnant and she mentioned that their nursery theme would likely be animal/jungle-ish so I wanted to try crocheting some cute little things for them. (I won't share pictures of those here, just in case she happens to read this!) Some of the animals I have tried out so far have been penguins, elephants and whales. Here is an elephant that I crocheted for my mother:
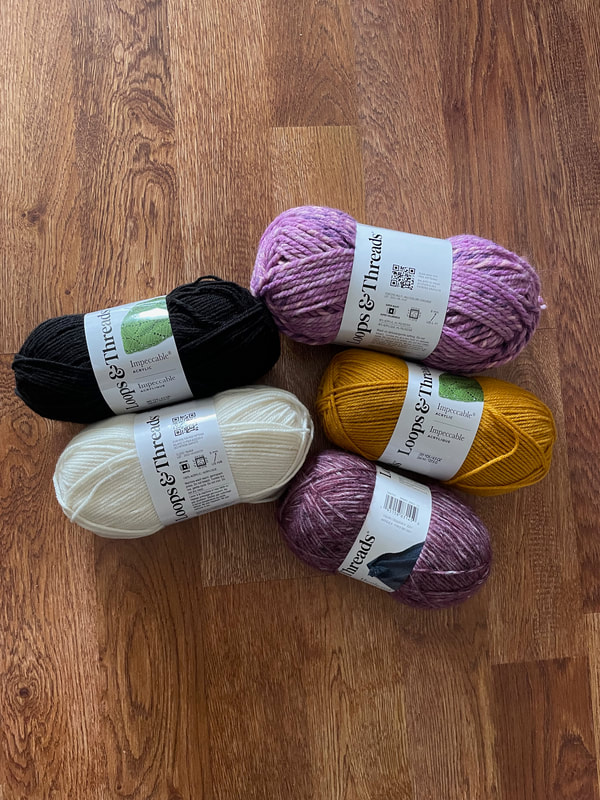
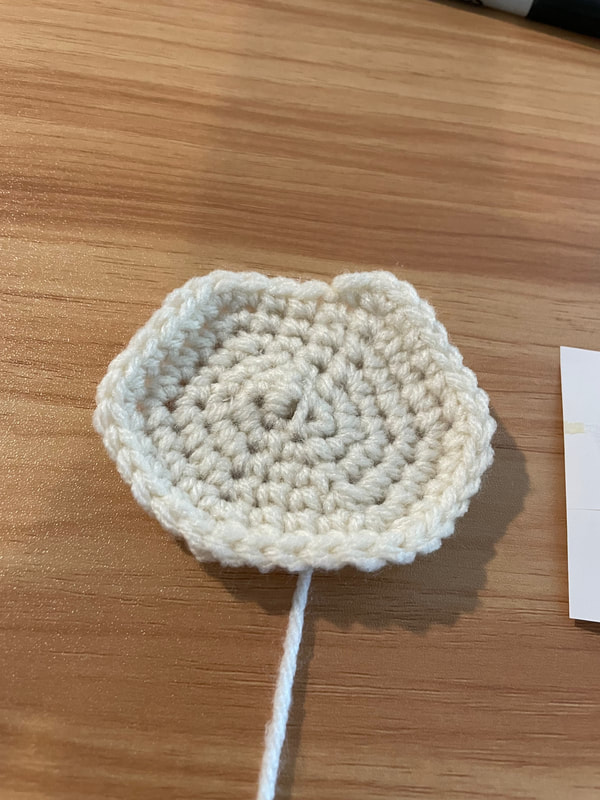
This is the pattern I used for the elephant for anyone who might be interested, although I did change it slightly: www.mariskavos.nl/free-elephant-crochet-pattern/ The elephant was probably the most complicated of the ones I have tried, but I have found penguins to be the easiest as they are basically a big oval with some additional pieces added on! I wanted to try my hand at altering the penguin crochet pattern I had been using thusfar to make a slightly chunkier and rounder penguin. I also wanted to try following this pattern using different weights of yarn to show you all how much of an impact your yarn makes in terms of the size of your final project. The pattern that I have made a few times and decided to alter slightly can be found here: www.roseandlilyamigurumi.com/2021/10/crochet-chubby-penguin-free-crochet.html?m=1 For any who might be interested in trying out my altered pattern, I will share that below! I wanted to try and make it fairly simple and only use basic stitches. I also wanted it not to include changing yarn while crocheting, so any different colored pieces are crocheted separately and sewed on. I want to say here that I don't believe I am good enough yet to give a tutorial on how to do different crochet stitches; what I will do is give a quick glossary of any abbreviations I use so that you can find a tutorial that works for you and helps you learn the necessary stitches! SC - Single Crochet MR - Magic Ring INC - Increase DEC - Decrease You will also need to know slip stitch. You will also need to know a chain stitch if not using a MR. Body R1 - 6 SC in a MR (or chain 2 and do 6 SC into the first chain if you struggle with a MR) (6) R2 - INC x 6 (12) R3 - (SC, INC) x6 (18) R4 - (2 SC, INC) x 6 (24) R5 - (3 SC, INC) x 6 (30) R6 - (4 SC, INC) x 6 (36) R7 - (5 SC, INC) x 6 (42) R8-16 - 42 SC If using safety eyes, attach between rows 10 and 11, 7 stitches apart. If using black yarn to sew eyes, sew over the 10th row of stitches, 7 stitches apart. Sew nose 1 or 2 rows below eyes, in between eyes and over 2 rows of stitches, in a triangular pattern. R17 - (5 SC, DEC) x 6 (36) R18 - (4 SC, DEC) x 6 (30) R19 - (3 SC, DEC) x 6 (24) Partly stuff. R20 - (2 SC, DEC) x 6 (18) R21 - (1 SC, DEC) x 6 (12) Finish stuffing. R22 - (6 DEC) x 6 (6) Fasten off with a slip stitch and use the tail to sew the hole closed. Wings x 2 R1 - 4 SC in a MR (or chain 2 and do 4 SC into the first chain if you struggle with a MR) (4) R2 - 4 INC (8) R3-R6 - 8 SC (8) Finish off with a slip stitch, flatten and sew open end together. Feet x 2 R1 - 4 SC in a MR (or chain 2 and do 4 SC into the first chain if you struggle with a MR) (4) R2 - 4 INC (8) R3 - (1SC, 1 INC) x4 (12) R4-R6 (12 SC) (12) Finish off with a slip stitch, flatten and sew open end together. Stomach R1 - 6 SC in a MR (or chain 2 and do 6 SC into the first chain if you struggle with a MR) (6) R2 - INC x 6 (12) R3 - (SC, INC) x6 (18) R4 - (2 SC, INC) x 6 (24) R5 - (3 SC, INC) x 6 (30) R6 - (4 SC, INC) x 6 (36) Finish off with a slip stitch, gently pull the piece into an oval shape without overstretching. Sew the stomach onto the piece, right under the nose. Sew the feet and arms onto the piece, making sure to place the wings low enough that they do indeed look like wings and not ears! Here are all the supplies/yarn I used for this project:
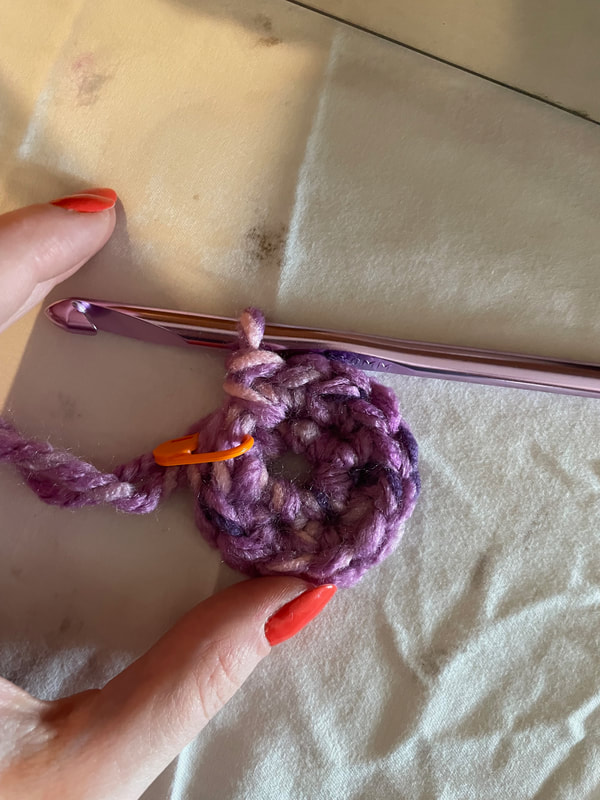
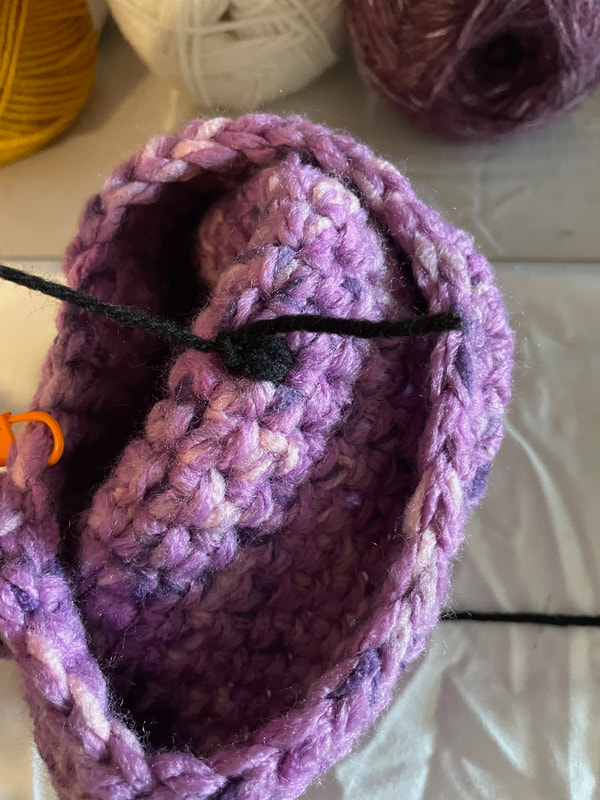
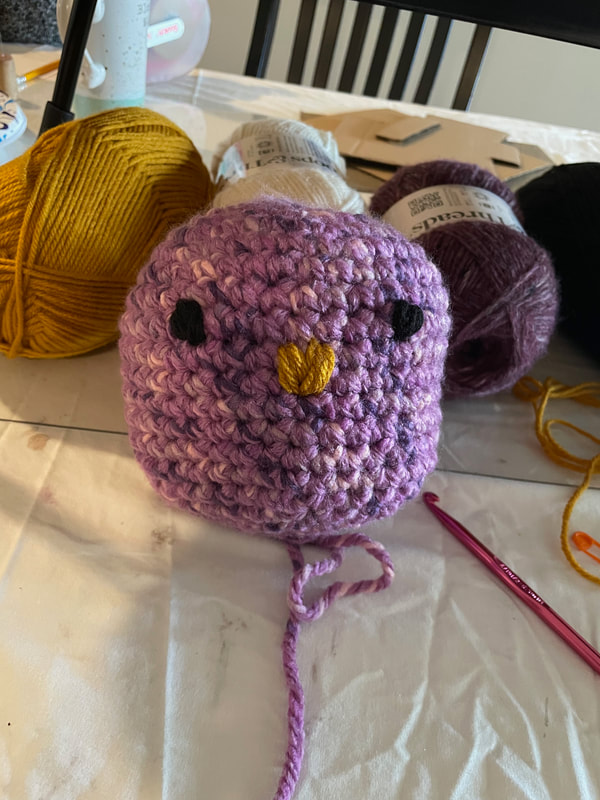
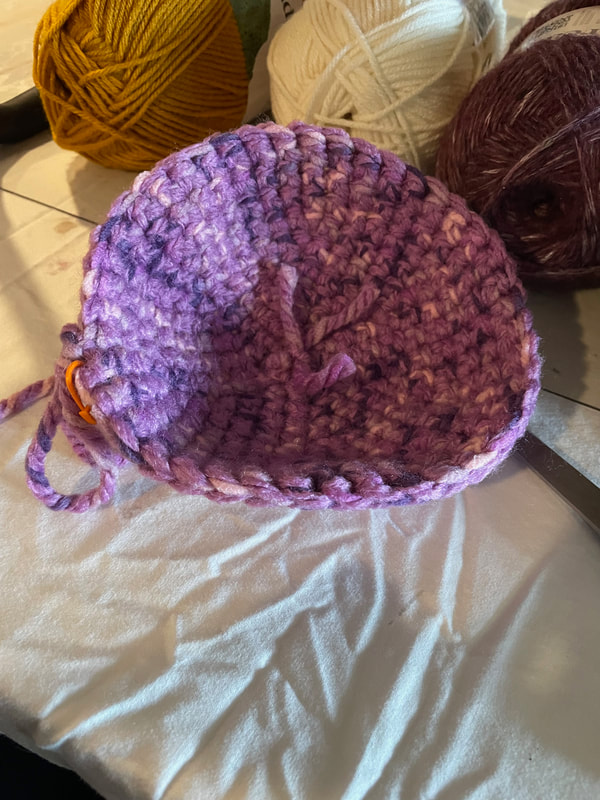
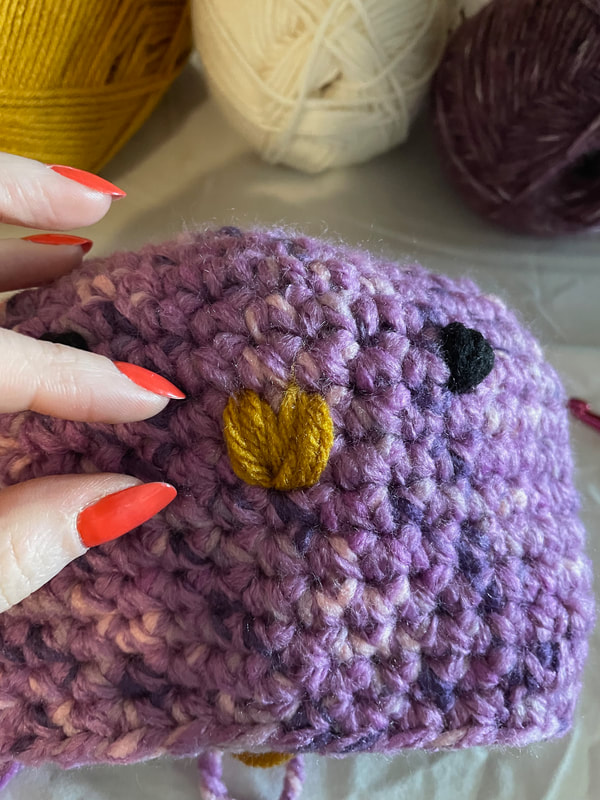
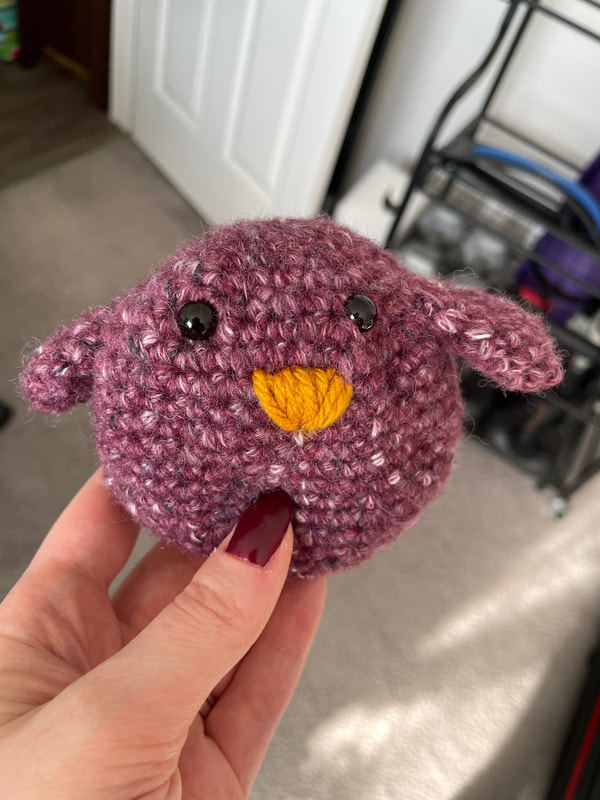
 For my first penguin, I used the super bulky purple yarn as the base. I made the body and wings out of this yarn, used a yellow yarn as the nose and feet, white as the stomach and black to sew on the eyes. The yellow, white and black were not as bulky as the purple.  Here are some photos of various stages of crocheting this penguin!
And here it is all completed! 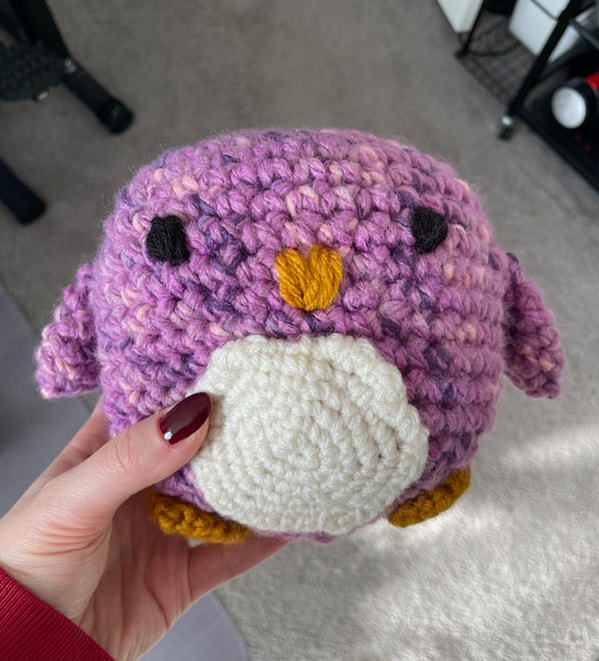 I love him! I then wanted to try the same pattern using a different weight of yarn to show you how much of a difference the size of your yarn plays in the final size of your piece. For this attempt, I used the smaller purple yarn I showed in the original picture of all the yarns above. This was a tweed yarn and I ended up figuring out that I would not recommend this type of yarn for amigurumi! It has a very thin and gauzy texture and I felt like it did not hold its shape well, meaning that my final piece was kind of lumpy and bumpy no matter how much I stuffed it. Once I realized that, I will admit I somewhat gave up on making this little guy look good and just completed it to prove my point about size differences based on yarn. I also used some safety eyes on this one to show you the difference that those can make. I like the look of the safety eyes, but if you are making something that might be near an infant/toddler or a pet, it's safest to simply sew on the eyes with yarn. If you are interested in safety eyes, you can buy a package of many sizes on Amazon for a good price. Safety eyes are essentially a little plastic screw that you push through the front of your piece, with another plastic piece you place on the back that locks everything into place. As I mentioned, I wasn't all the interested in this second penguin looking good (I kind of think he ended up looking like a puppy as I didn't listen to my own advice and made the wings look like ears) so ignore his general silliness and just focus on how much smaller he is than my first one!
I hope that was somewhat helpful to show how the same pattern can yield wildly different results based on the size of your yarn and hook!
I know this wasn't a perfect tutorial or introduction to amigurumi, but I hope it gave you all somewhat of an idea how it works and the kind of results you can expect to see when trying it out. I have been having so much fun expanding my crocheting knowledge and have been reminding myself that it doesn't need to be perfect every step of the way. I have been working on some other crocheted pieces and am hoping to have some things to add to the shop soon. If anyone happens to try this pattern and has any feedback about ways that I could make it better or clearer, feel free to drop those in the comments below. Talk to you all soon! - Rebecca P.S. Today's photo on the homepage is from Pexels user Anete Lusina: www.pexels.com/photo/crochet-needles-and-threads-on-windowsill-4792084/ Hi everyone! I don't have any big projects to show you at the moment so I thought it would be fun to do a chit-chatty blog today that was more geared towards someone who is just starting their crafting journey. I have been crafting for quite some time so have accumulated a good amount of tools and supplies, but many of my preferred crafts can be easily started on a very small budget. So in this blog I will be touching on some of the crafts that I love to do and the very basic things you would need to get started with each! This will not really be a tutorial on each craft, but a basic guideline of what you will need in front of you before you begin.
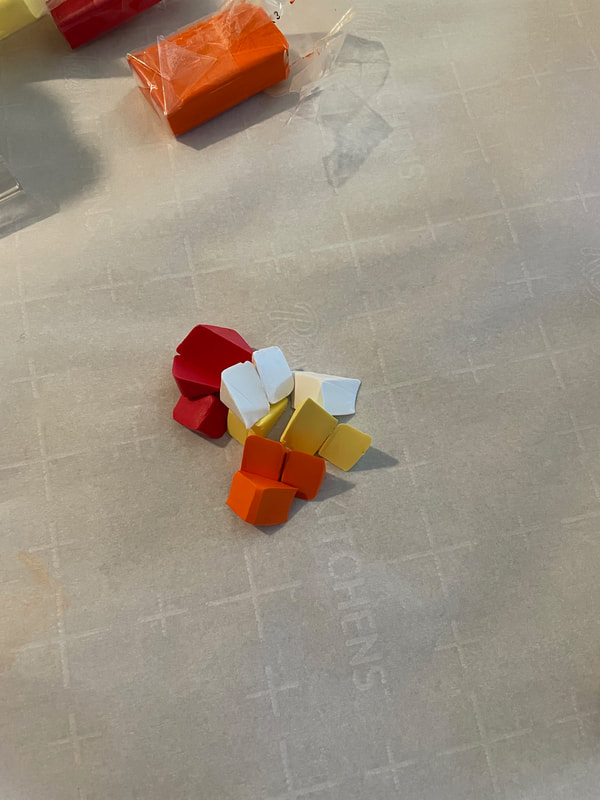
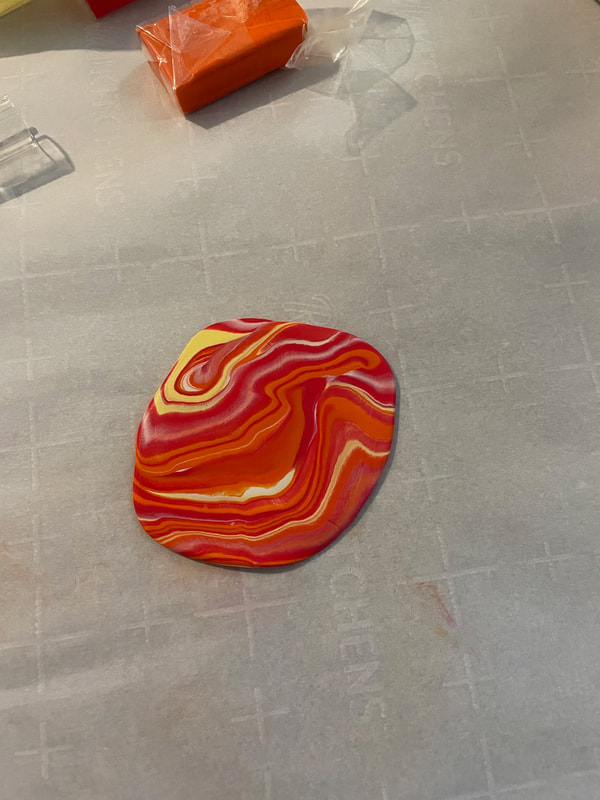
Crocheting The one I am going to start with is actually the most recent crafty skill I have picked up: crocheting. Just to get the basics out of the way, knitting is when you use 2 needles and crocheting is when you use 1 hook. Anything I say here will be referring to crocheting as I do not know how to knit! I have heard many people say that crocheting is usually considered the easier of the two and is a better option for someone who wants to get started. I do think its important to point out that crocheting does put a decent amount of strain on your fingers and wrists. Your fingers will be gripping both the yarn and the piece you are working on and one of your hands will constantly have to be adjusting the tension of your yarn. If you struggle with pain or numbness in your fingers it may be the case that crocheting is not a great fit for you or it may help keep your fingers moving to combat that pain; that is up to you to choose! At its most basic level you really do only need 2 things to start crocheting, yarn and a crochet hook. You could probably walk out of a craft store with a few balls of yarn and a variety pack of crochet hook sizes for less than $20. Every ball of yarn I have seen has information on the packaging to help you know the size of crochet hook you will need to work with it; essentially the thicker or chunkier the yarn, the bigger the hook you need. If you would like to invest in a few more things, I would recommend some stitch markers and a plastic yarn needle. It honestly took me until about 6 months into my crocheting journey to understand how helpful stitch markers can be so if a pattern calls for using them, I would listen! Once you have your yarn and hook (and stitch markers and needle if you have grabbed those) you really just need some time and a YouTube video to get started. There are countless free tutorials on Youtube that can get you started and help you learn different stitches. I would recommend starting with some videos before you try your hand at a written crochet pattern as it really helped me to be able to see someone's hands making the movements that I needed to repeat. Beading Another crafty skill that I find I use in a lot of different craft projects is beading. If you are interested in giving this a try, I would recommend starting with the classic stretchy bracelet. That may seem boring but the great thing about beading is that there are endless types of beads out there so you can really make any style of bracelet that you'd like. To get going on your stretchy bracelets you really only need 3 things: beads, some type of jewelry cord and a strong adhesive like SuperGlue. SuperGlue is technically not necessary, but I have found it invaluable for ensuring that my knots are extremely secure and my bracelet does not come undone. I am a big fan of tiny glass beads and letter beads and the style of bracelets I like to make is a cutesy friendship bracelet style. If you are looking for a different style of bracelet, just pick beads that match what you are going for! When talking jewelry cord, I would always personally recommend an elastic plastic or rubber cord. Any kind of fabric cord may get ruined if the bracelet gets wet at all, but a plastic/rubber cord will be fine even when wet. I also feel like plastic cord keeps its stretch longer. Also just make sure that the thickness of cord you buy will fit into the hole in your beads! As I said, SuperGlue is not needed, but I always do a tiny dot of a strong-hold, fast-dry glue after I have knotted the cord to finish the bracelet. Acrylic Pour Painting Finally, let's talk about acyclic pour painting. Anyone who has been following the blog for a little while knows that I am a big fan of pour painting and have tried many different applications of it. I saved this one for last as it likely will need the most supplies and time and will have the greatest cost of any craft on this list. However, I do think that people might assume that pour painting is much harder than it actually ends up being. At the most basic level, you really only need a canvas and some pour paint. For someone just starting out, I would recommend getting a pack of smaller canvases like 4 by 4 or 6 by 6 inches. I would also recommend buying a set of premixed pour paints. You have the option of buying regular acrylic paint and then buying an additional pouring medium that you have to mix into the paint to make it thinner and easier to pour, but you can also buy paint that is already mixed and will be the texture you need straight out of the bottle. If you feel like investing a little more, I would recommend some gesso (which will also require a paintbrush to paint onto the canvas), disposable gloves, plastic or paper cups, thin wooden dowels or shims that you can lay your canvas on, some sealer and a drop cloth if you don't have something like newspaper or cardboard you can lay down on your surface. Gesso is not required at all, but think of it like priming a wall before you paint. It helps to seal your canvas before applying the paint and generally creates a more even texture for your paint to stick to. Gloves and a drop cloth will simply help ensure you and your surfaces stay protected as pour painting can be quite messy and acrylic paint can be nearly impossible to remove from porous materials once it has dried. The cups will allow you to create more interesting paintings as you can layer different colors together before pouring them on the canvas. The wooden dowels or shims are helpful when you set your pieces down to dry; it will create a little space between your canvas and the surface they are drying on and allow any excess paint to drip off the sides. Finally, sealer will just protect your piece once its dry! The great thing about pour painting is that it's meant to be abstract so don't worry about perfection. Find a YouTube tutorial that interests you and see what you can make! Obviously these are not the only crafts out there, but these are 3 that I love and feel that I know enough about to give a little advice on. If you are interested in starting a craft and learning a new skill, always remember that everyone had to learn. Don't compare yourself to someone who has been doing something for 20 years if you have been doing it 20 minutes. Just enjoy yourself and give something a try to make sure you like it before investing in additional supplies for it. Happy crafting! - Rebecca Hello everyone! I hope you are doing well this Sunday. Today I have a fun project to share that is a bit different for me, some earrings! I have had some dangly earring bases for a while that my mother had given me and I figured it was time to put them to good use. I thought it would be fun to combine this idea with something else I don't use too often, polymer clay. Below are the main supplies I used for this project: a variety pack of polymer clay, some clay cutters, head pins which are used for beading, the earring bases, clay tools and some tiny little beads. Not pictured but also very important are a variety of jump rings! 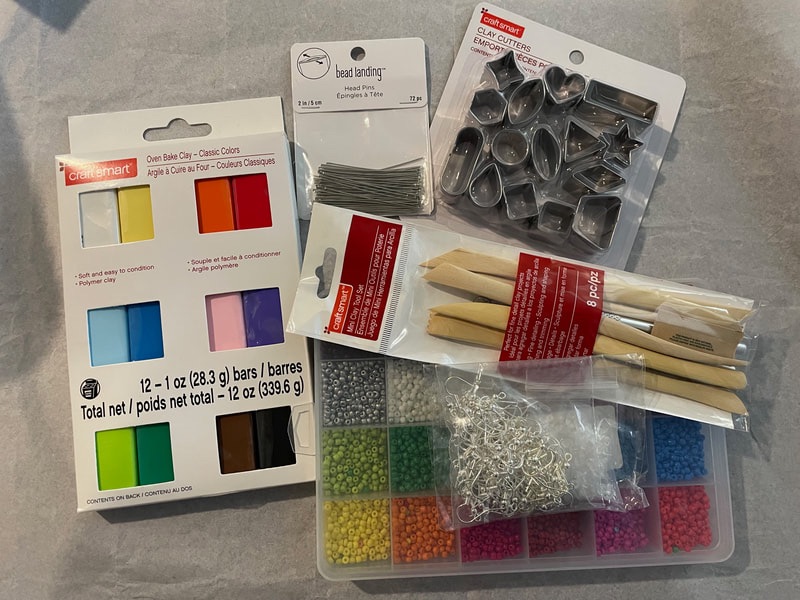 I decided that I wanted to go for a marbled effect with different clay colors so I started by cutting up a few clay colors into little pieces. I then rolled and squished the clay together until I had the effect I wanted, making sure not to overwork it so that the colors would just bleed together.
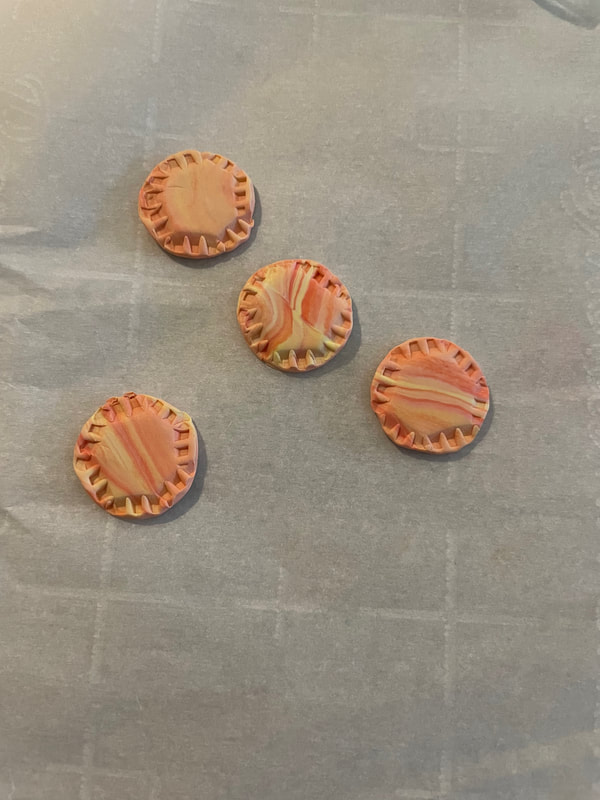
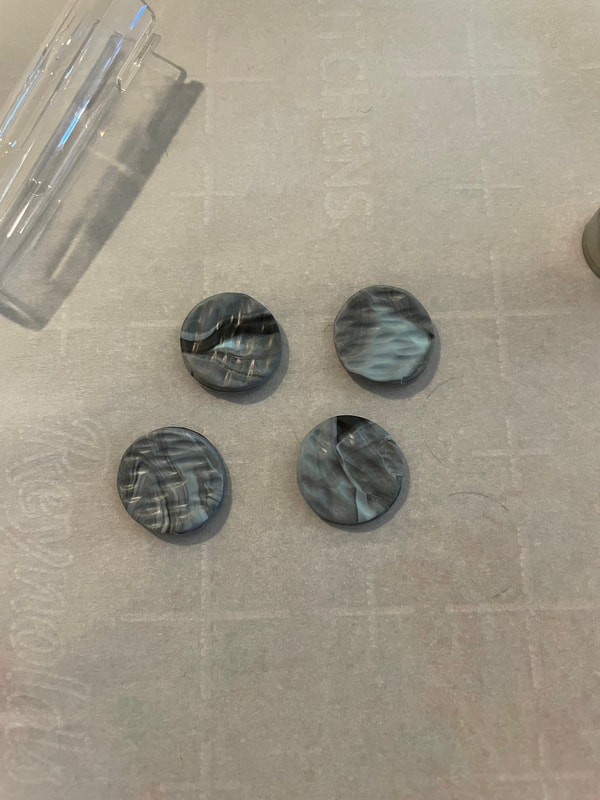
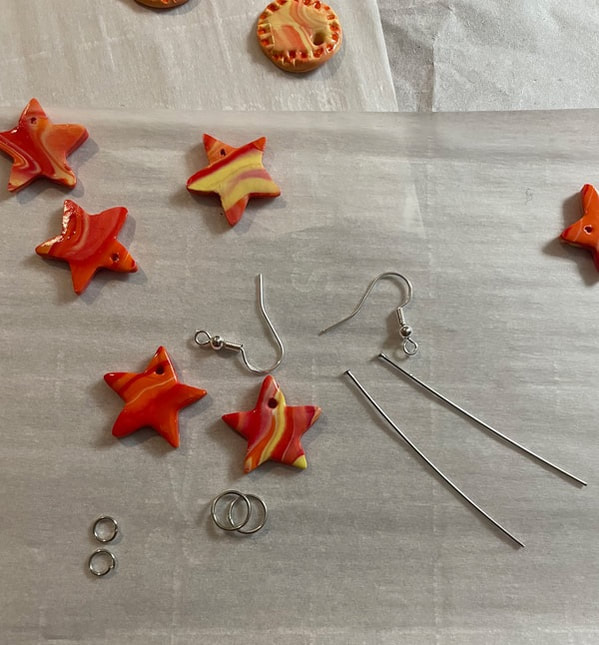
I went for 3 general designs with this batch: stars, suns/moons and some pairs with the phrase "hi there" on them. The stars were cut out of the red/yellow/orange/white clay I showed above. For all the pairs, I used a pointy tool to poke a hole through the top. 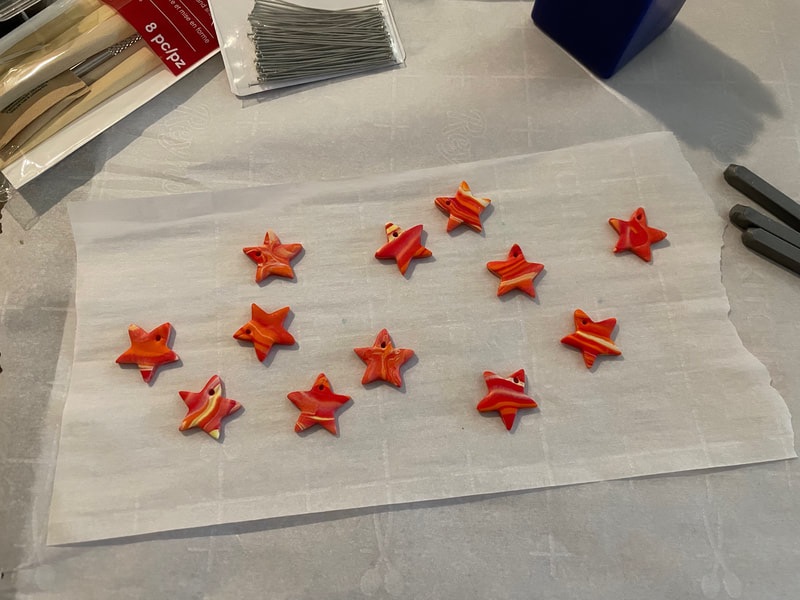 For the suns and moons I made the suns out of some yellow/orange/white clay and the moons from some gray/white/black/blue clay. I also added some texture to these with some of the clay tools I had. I also ended up adding some orange paint to the little ridges on the side of the suns and some white paint to the valleys on the moons.
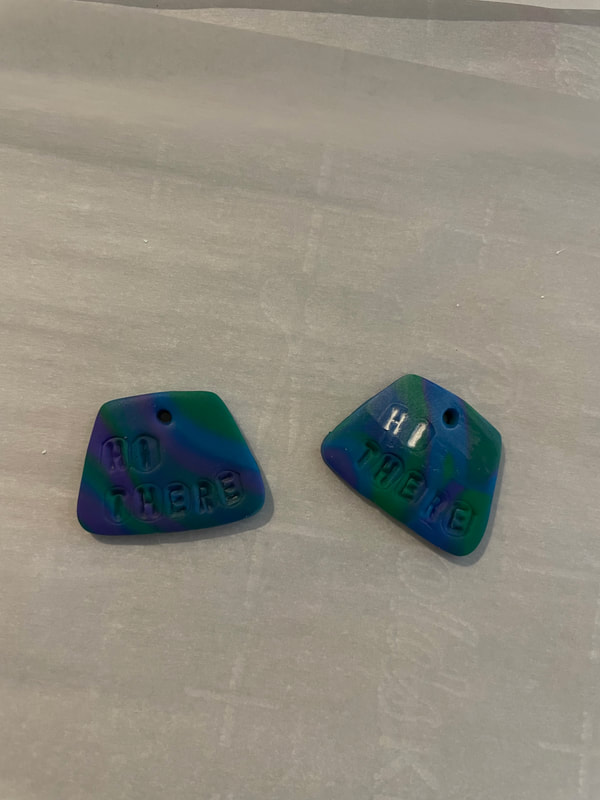
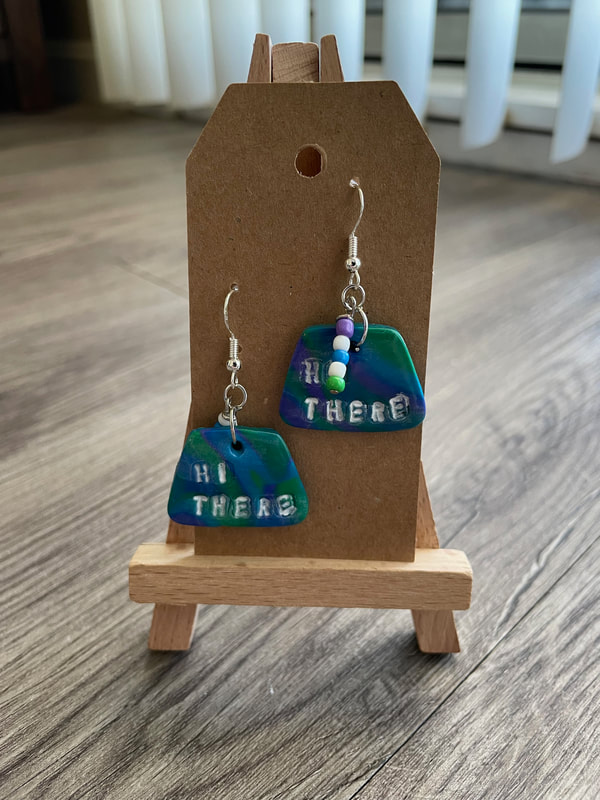
For the final pairs, I used purple/green/blue clay and also used some tiny little letter stamps to make impressions in the clay. The stamps I used are actually meant for banging letters into metal, but they worked here. You could also get the same effect by pressing rubber stamps into the clay. Once these had been cooked and cooled, I added some white paint into the indents to make them stand out more. I did this by brushing a thick layer of white acrylic paint over the indents and then quickly wiping away the excess with a wet paper towel.
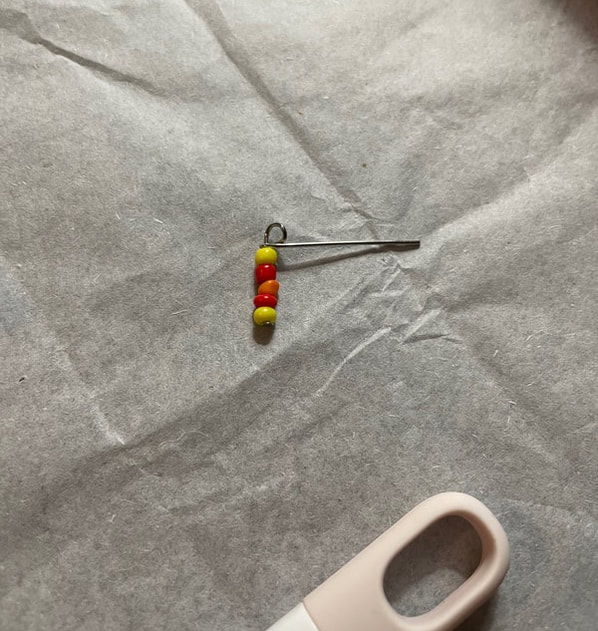
I cooked the clay according to the package directions and let them cool fully. I then went over all of the clay pieces with a thick coat of the varnish I always use, DuraClear. I used a high gloss version for this project. In terms of the hardware pieces needed for each pair, I ended up using 2 earring bases, 2 head pins, 2 smaller jump rings and 2 larger ones, as well as 10 small beads. I came to the conclusion that a little detail of 5 beads was the perfect amount for each earring. In case you are not aware of what a head pin is, it is a piece of wire with a flat end that stops the beads from coming off. The little beaded detail on the right is 5 beads that were slid onto the head pin with the non flat end bended over to create a loop. I then used some wire cutters to get rid of the excess wire on the head pin.
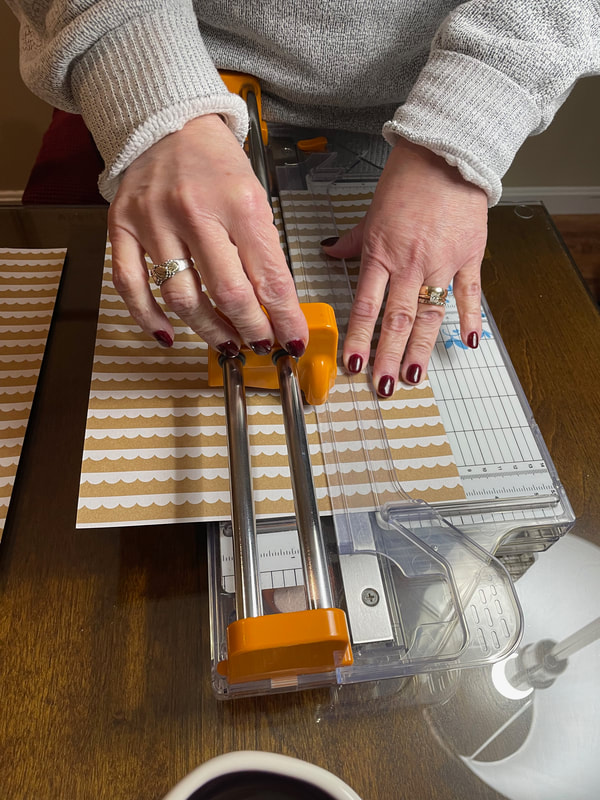
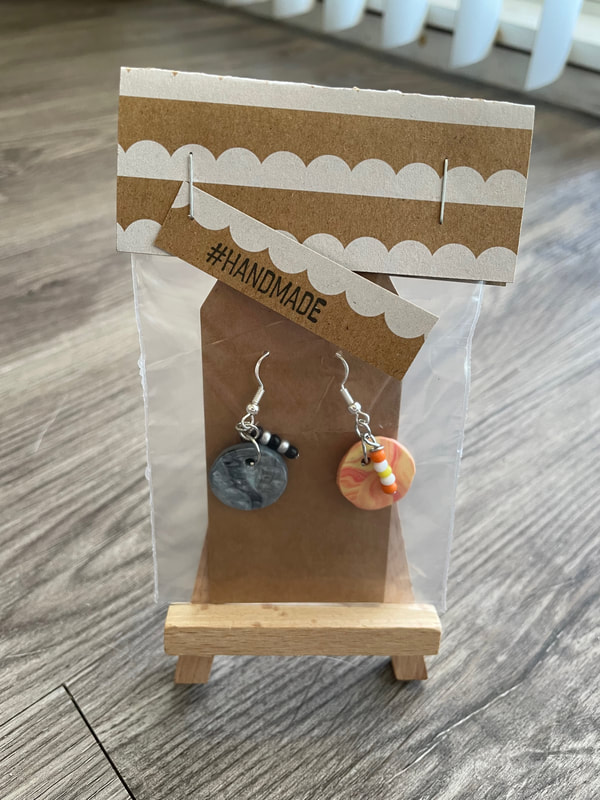
Then it was just assembling the earrings using the jump rings and some pliers! My mother also had the smart idea to put them on these cute little tags that we punched holes into. She was also nice enough to cut some toppers that I could put on top of the little bags I planned on putting each set it. Here is an example of what a fully packaged set looks like:
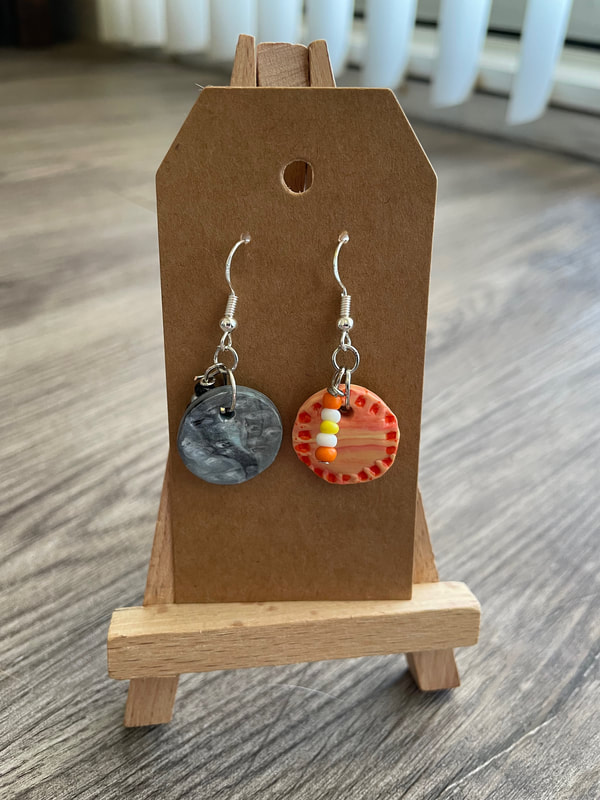
Here's a close up of each type of set I made so you can see the details!
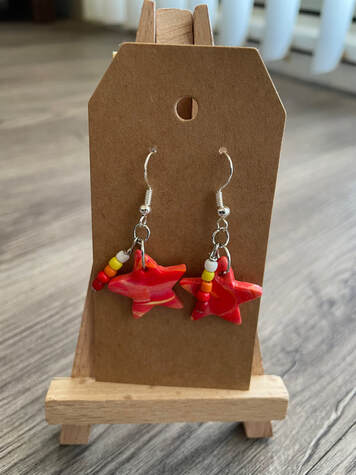 These are now up on the Etsy shop if you are interested! I had a lot of fun making these and trying something a little different for me. Let me know what you guys think in the comments below!
- Rebecca P.S. Today's photo on the homepage is from Pexels user Antoni Shkraba: www.pexels.com/photo/a-person-kneading-a-clay-dough-6694683/ |
AuthorI am a 27-year-old crafter and baker from New Hampshire! Archives
July 2024
Categories |


 RSS Feed
Proudly powered by Weebly