|
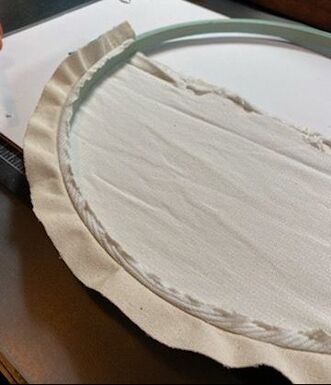
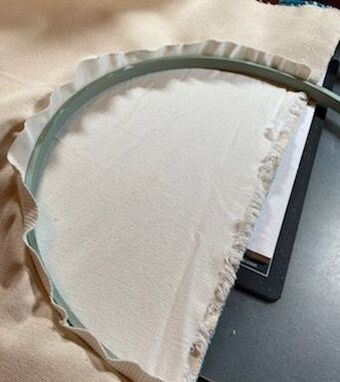
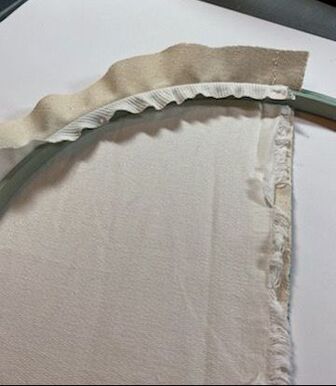
Hello friends! This is Suzanne, Rebecca's Momma, and I'm happy to be back with you this week as a guest blogger. You may remember Rebecca mentioning last week that she and her husband are moving. Rebecca's dad and I are also moving soon, so I’ve already begun packing up much of my crafting stash. When it was time to put something together for this week's post, I had to see what was still available and came up with a simple decoration that would be great on a door or inside your home and is changeable for any season. Let's get started! What I have is a 12 inch embroidery hoop, some muslin cloth, burlap ribbon, a paint color which coordinates with the ribbon and a foam brush. I'm also going to use my glue gun and some scissors, and later I added some lace ribbon and flowers from my stash. 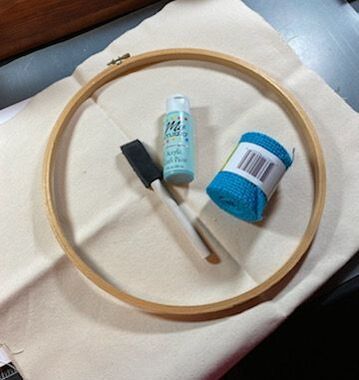 To start I painted a light coat of paint over the entire embroidery hoop. I didn't want too heavy saturation of color because I wanted the wood grain of the hoop to show through the paint. 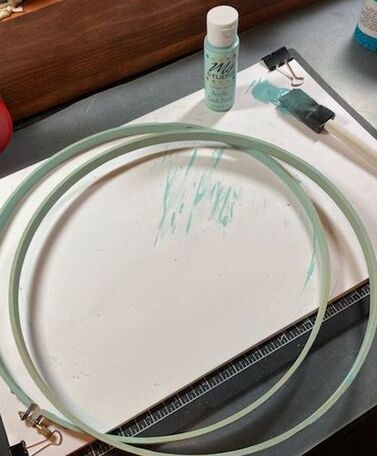 While that was drying, I ironed my muslin cloth to make sure there were no fold lines in it and added a row of burlap ribbon across the salvage edge (that’s the bound edge of fabric that does not fray). 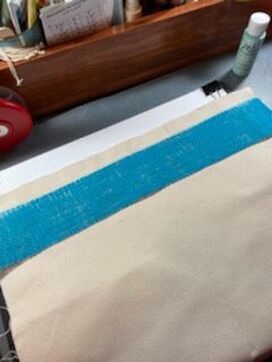 To finish off the top of the burlap edge, I also added a layer of lace and I pulled out a couple of rows of the burlap ribbon to make a little fringe across the bottom. 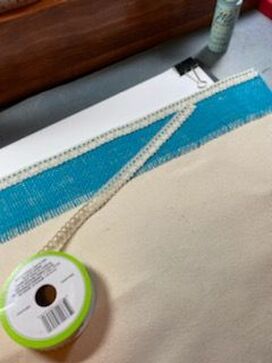 Next I laid a double layer of the muslin fabric over the inside ring of the embroidery hoop, about half way down the hoop, and attempted to add the outside hoop over the whole thing. Here's where I ran into a little issue. The two layers of muslin together with the layer of burlap and lace ribbon was too thick for the embroidery hoop, so I pivoted and removed the underneath layer of muslin, switching it out for a thinner fabric. With the thinner fabric in place, I was able to push the outside hoop down over the layers and the inner hoop capturing everything within the embroidery hoop. I tightened up the screw in the top of the embroidery hoop (which I had made sure was centered over the top of my fabric) and gave everything a tug from the back to be sure it was nice and taut across the front. 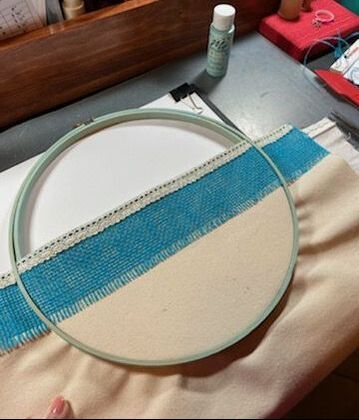 I cut away both layers of fabric and began to glue them in place on the backside of the embroidery hoop.
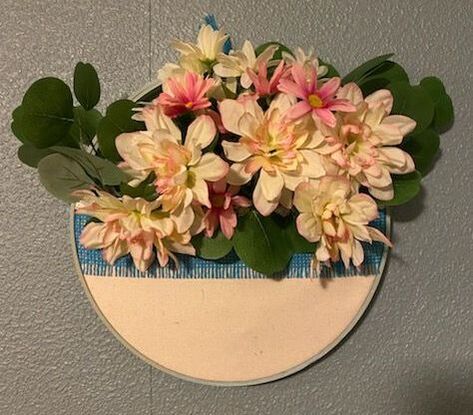
 I added a layer of burlap ribbon across the backside as well, to give the top of the back pocket some body and cover the less than neat fold over from the layers of ribbon. I used the strands of burlap I’d pulled out to make the fringe to tie through the screw in the top of the embroidery hoop and made a simple hanging loop and that was it! 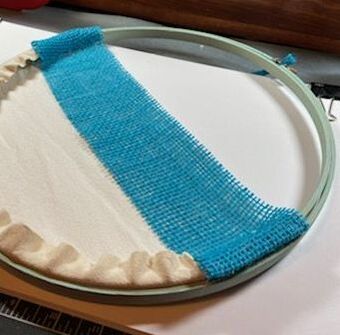 I raided my stash of silk florals and first filled the pouch with greenery and flowers tinged in pink. I then tried a more monochromatic look of cream colored daisies with yellow and brown centers. I wish I had a pothos-like plant, because I think something trailing down out of the pouch would be pretty. These are silk flowers, but you could absolutely put real flowers, well secured in a plastic bag, in the pouch. If you used a more neutral burlap ribbon and stain (rather than paint) on the hoop, I can see this filled with greenery at Christmas time. If the Cricut wasn’t already packed away, it would also have been sweet to add “Welcome” or our last name to the bottom of the pouch.
I’ve been spending so much time purging and packing in preparation of our move, it was great to spend a few minutes doing something crafty!
Rebecca here. Thanks for reading everyone. And Happy Father's Day!!
0 Comments
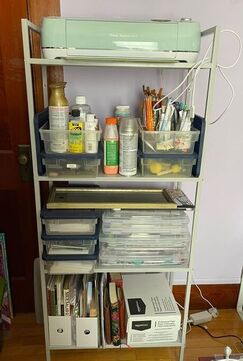
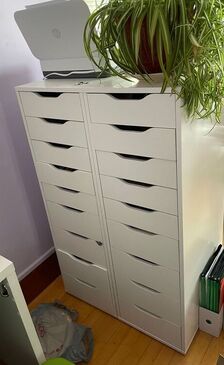
Happy Sunday everyone! This week's blog will be on the shorter side and is more of a conversation about craft room organization than a description of a DIY. As those of you who have been reading the blog for a while know, my craft room has gone through several iterations over the past 3 years. I upgraded to some IKEA furniture, moved things around, had to make some changes when I started working from home, moved some things around again and now my husband and I are ..... moving! Which meant it was time to reassess my crafty situation. For those who might not remember, my crafty set-up most recently was a corner IKEA desk, 2 tall IKEA drawer units, 1 short IKEA drawer unit and one metal bookcase. Although the apartment we are moving to has a similar sized office room to the one we currently have, it was still a good opportunity to be honest with myself and do some purging. the first big purge will be the IKEA corner desk. While good in theory, I ended up not loving this desk and finding that it wasn't well-suited to actual crafting, but was well-suited to me dumping lots of junk on it ...... So my plan in the interim will be to use a desk given to me by my Pepere for any small-scale crafts that I do and invest in a larger desk once we eventually buy a house. I also decided that it was time to get rid of one drawer unit that I had. I opted to clean out the smaller, shorter drawer unit I had as the drawers were shallow and I didn't find it as useful as the taller units. So now the craft storage that I will be left with are the bookcase and the two taller units:
A few days of cleaning and purging were required to get down to these two storage units. Some of the things purged were beads, Perler beads, countless glass bottles, mosaic glass pieces, SOOOO much paper, many stamps and some stickers.
I also reorganized my paper, cards and stickers to fit on one of the shelves of the bookcase. The bookcase now holds my Cricut, paper, stickers, cards, paint and paintbrushes as well as a few extra things on the bottom shelf. The two IKEA units hold some tools, Cricut supplies, my loom, yarn, felt and other fabric, a few select stamps, clay tools, glues/tapes, ribbon, colored pencils and other coloring implements, sanders and a few other random bits. There is even some extra room to spare in there! This exercise really helped me hone in on what crafts I actually enjoy doing and see myself doing in the future. I shouldn't be keeping something because I "might" do it, but should keep supplies that support crafts I know I enjoy doing and will continue to do in the future. This amount of supplies will also be much easier to transport to the new apartment which is a plus! What cleaning have you all been doing lately? Let me know in the comments below! - Rebecca |
AuthorI am a 27-year-old crafter and baker from New Hampshire! Archives
July 2024
Categories |

 RSS Feed
Proudly powered by Weebly