|
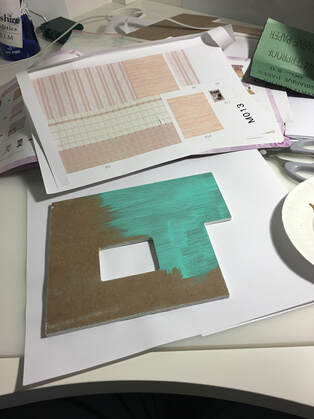
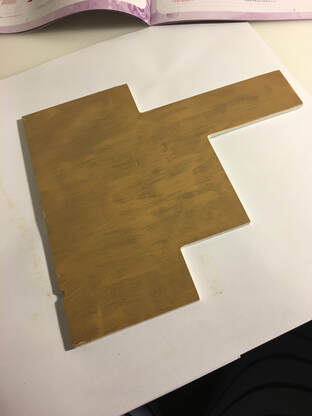
Why hello there friends! Today's blog is a part one of two where I will be showing you how I customized a do it yourself dollhouse kit. I have always loved dollhouses. I'm not sure why, but I've always just loved little versions of normal sized things. Little fridges, little couches, little side tables: that's the good stuff. Anyways, I love putting together kits of small dollhouse rooms and usually customize them a bit from the directions. This is the kit I purchased this time from Amazon: 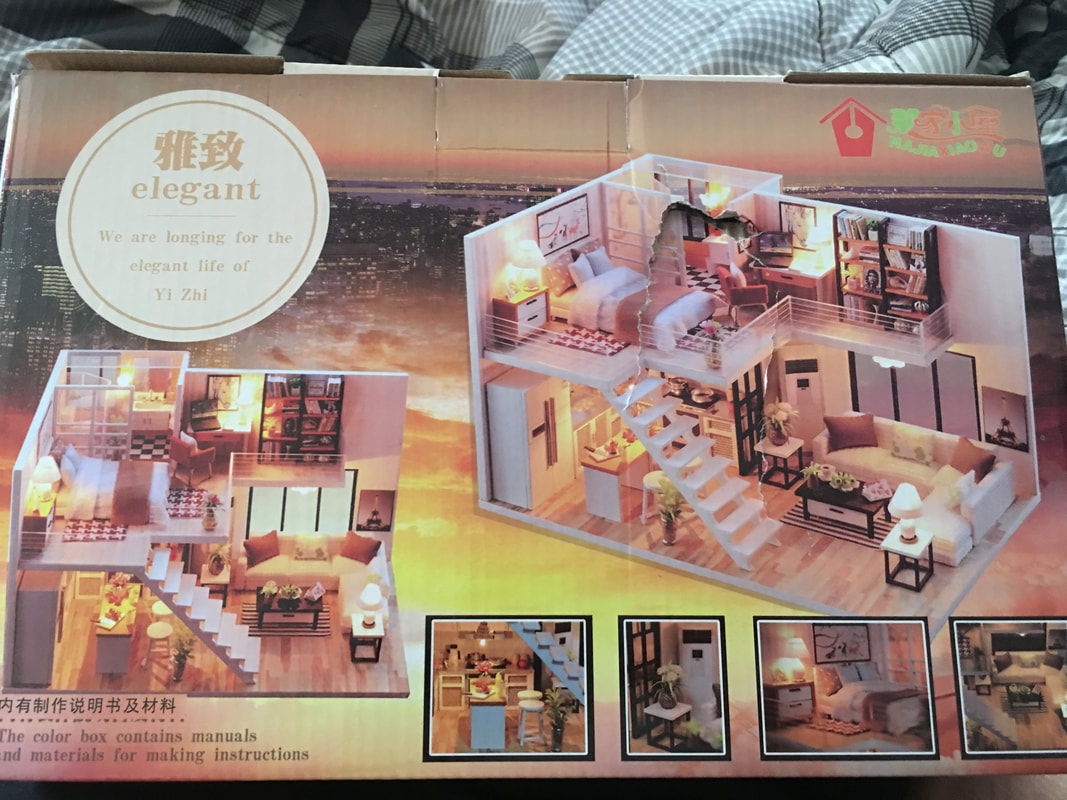 The box and directions were not in English, but the pictures are the most important part in figuring out how to put the room together so this was not really an issue. I didn't really listen to the directions from that start anyway. These kinds of kits always come with some cutouts for you to use as flooring and wallpaper, but I think that those typically make the whole piece look a little more dated. Usually I just paint the walls and floors the way that I want because, well, I'm a grown up and I can do whatever I darn well please. For this kit, I chose to paint the walls a fun teal and just give the floors a couple coats of a medium toned brown.
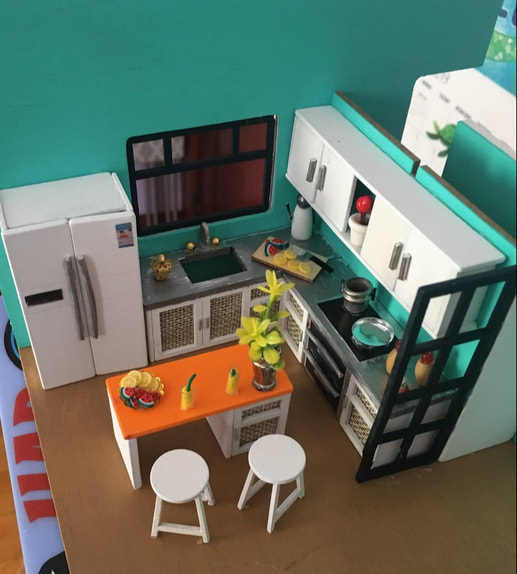
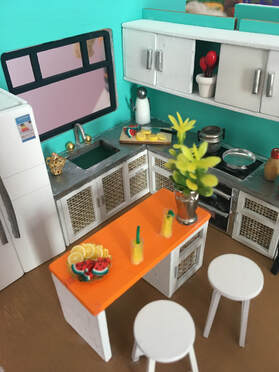
After doing this, I got started on the kitchen. I mostly followed the directions when putting together all of the pieces for the kitchen, but did change where some of the smaller decorative pieces got put. The directions also showed how to make a vent hood for the oven but it was covered in the same shiny silver paper that the counters were and frankly I was sick of using it because it's a little finicky and hard to adhere to the small wood pieces. Putting this kitchen together took me about an entire evening. The only tools and supplies I needed outside of the kit itself were some paint and paintbrushes (which you wouldn't need if you used the cutouts you were given), some tweezers (to help when adhering small pieces together) and some SuperGlue. SuperGlue is always my glue of choice but I will say to be careful when using it for projects like this as the formula of the glue sometimes strips the color off of the pre-painted pieces of wood; so always make sure that no extra glue seeps out from where you are gluing. Here's what I have so far for the dollhouse:
Next week I should have the whole dollhouse done for you all to see! Leave any questions you have about this dollhouse in the comments below!
- Rebecca
0 Comments
Hello everyone! The time is here. I promised another video coming around the end of March about our craft room/office makeover and here it is! I am not great with words and stumble over a few sentences in the video so please be kind! Also while watching it back, I realized that I used the world "delineate" a lot and I think I used it in the right context but just ignore me if I didn't :) I also know now to take video on my phone the other way so that it is not such a small slice of the screen. I am learning! Enjoy! Please leave any questions you have about the products from IKEA or the craft room update in the comments below and I will be happy to answer them!
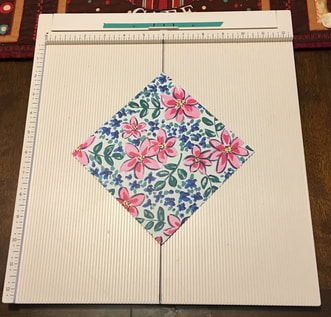
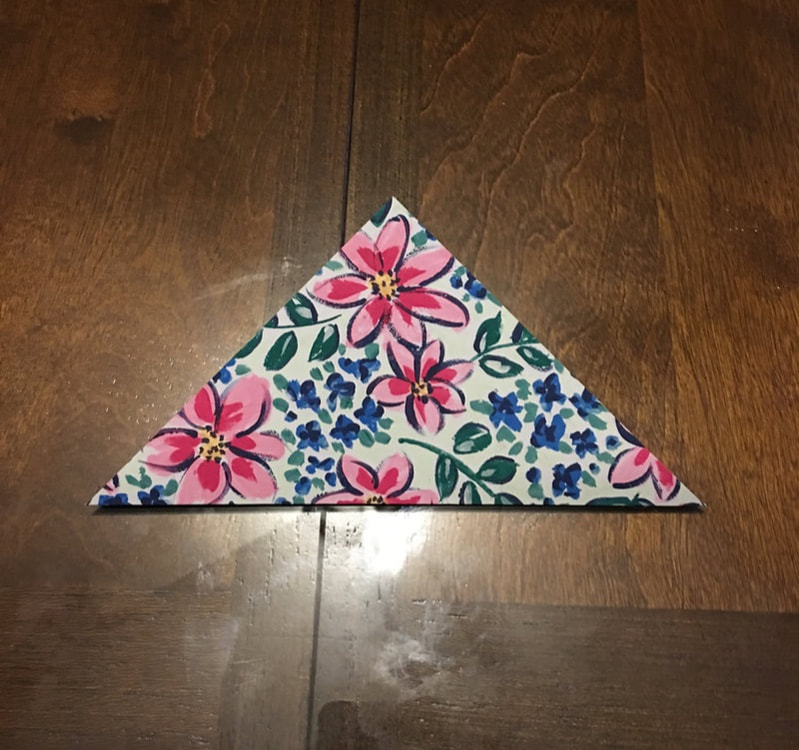
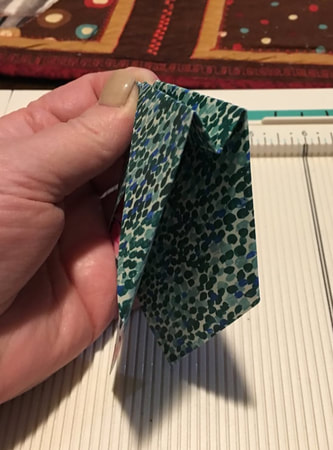
- Rebecca Hello Crafty Friends! It’s Suzanne, Rebecca’s Momma, and I am happy to be back on the PPP with a guest post this week while Rebecca enjoys a well-deserved mini vacation. Today, I am getting back to my roots with a couple of paper crafting projects. We are going to make a couple of cute little treat holders that are perfect for class room or office gifts for any holiday or favors for bridal and baby showers. These treat holders can hold anything from fun sized chocolate bars to tea bags to gift cards. Each of them can be made with just one square of paper. Today, we are going to use 6 inch by 6 inch paper, but you can scale up to hold larger treats. You just have to be sure that your paper is square. I am also going to use a scoring board to pre-score some of my fold lines. This is not necessary but it does ensure that your holders are all the same size and speeds up the process of making them. If you don’t have a score board, you can score your paper with a ruler and stylus or butter knife. You should also burnish your folds – use a bone folder or your trusty butter knife to press down each fold to be sure it’s nice and sharp. Let’s talk a minute about the paper you’ll use for these. I recommend a good quality double sided 65 pound decorative paper. Cardstock, like you would use for the base of a greeting card, is a little too thick and makes it difficult to crease your folds. Printer weight paper is too thin and doesn’t have the strength to hold up to the handling. The paper I am using is from Stampin’ Up and has a number of beautiful floral patterns. I’m having a ladies brunch next weekend, so these will make nice little takeaways. 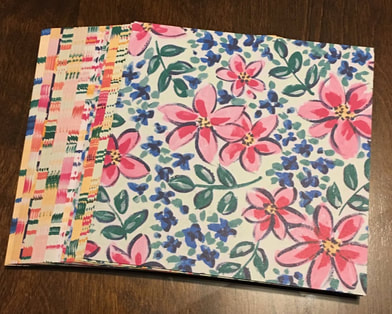 First up is a pouch that looks a little like a French fry container when it’s done. For this one, score your paper right down the middle and fold in half corner to corner to create a triangle.
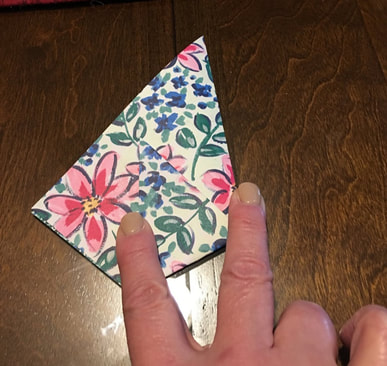
Next, pick a point about halfway down the side of the triangle and use that as the point from which you’ll fold towards the other side. You are trying to keep the top portion of the new triangle being created by your fold parallel with the bottom fold. Do the same on the other side, crossing over the first side.
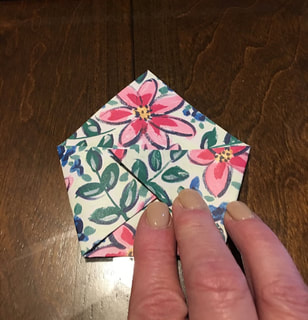
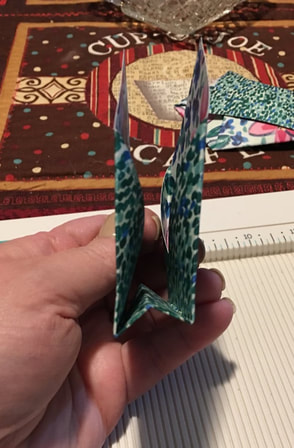
Now, take the front piece from the top and fold it down over the two front triangles, holding them in place. Use your fingers to open up the pouch and add your treats. You can add a flower or a small stamped sentiment to the front. You could also punch a hole in the top point, add a ribbon and hang small treats on the Christmas tree. 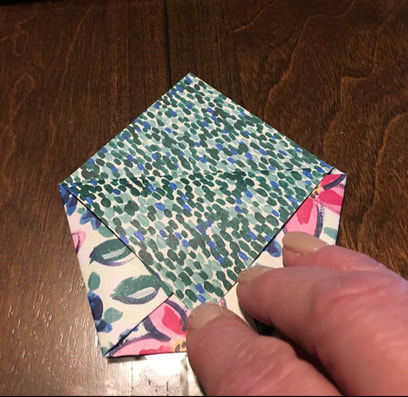 Second, we’ll make a two sided holder, where the treats can either be hidden to be revealed when the holder is opened, or displayed on each side. You’ll start the same way as the last holder, scoring the paper down the middle from corner to corner. Make two additional score lines a half inch to the left and right of the center line. 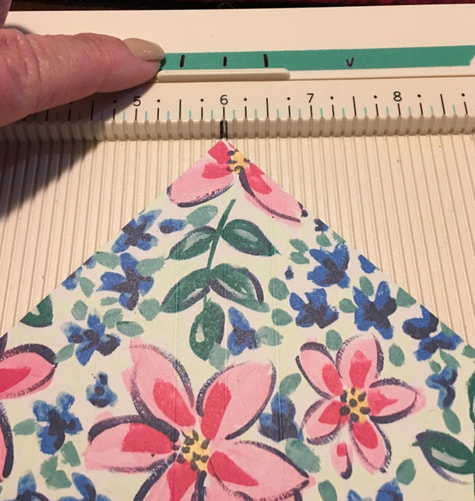 Then, turn your paper to score opposite the lines you just made. These will be made an inch and a half either side of the center – just two score lines. 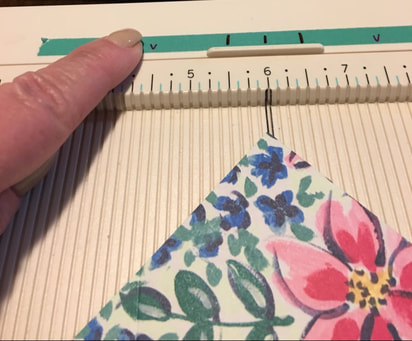 Then, fold these two sides in toward the middle, crossing the points over each other. 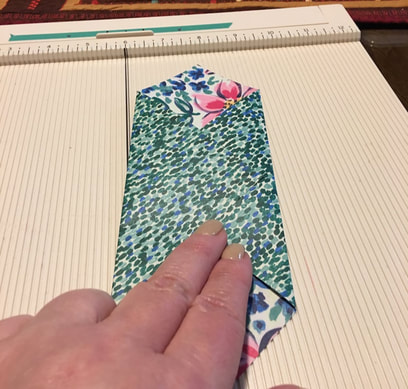 Next, decide if you want your treats hidden or visible. If you want them hidden, fold in half on the center score with the crossed over points to the outside. Then fold each side up on the second score lines, creating a “W” at the bottom of your holder. This will leave the pockets on the inside of your holder. If you want your treat visible, do just the opposite, starting with the crossed over points to the inside. For this one, you’ll punch two holes in the points at the top of the holder and use them to tie it together.
The beauty of these little guys is that they require no adhesive and, depending on the paper you use, can be left as is or embellished just a little, for the holiday or event. Here are my finished products with treats included. I hope you enjoyed today’s items. Now, go fold some paper! 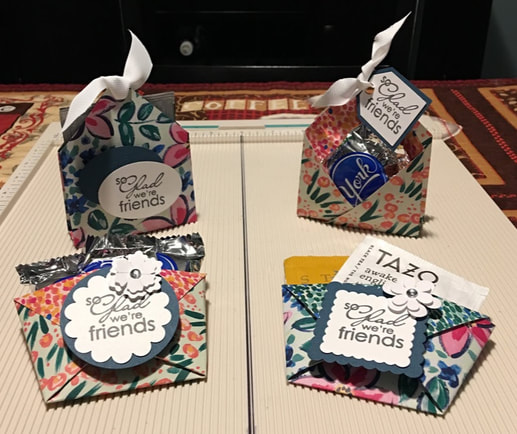 P.S. Rebecca speaking: A big thank you to my mother today for her blog! Everyone tell her how great she is in the comments!
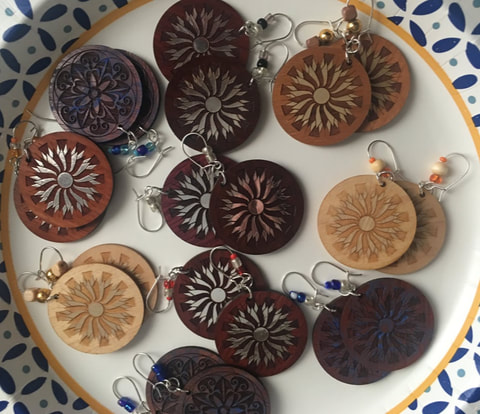
Why hello everyone! Today we have an easy craft project: some earrings! I don't typically make jewelry because its not really my type of craft, but I was given some really cool pendants from my cousin and they just needed to be turned into earrings! Look at how beautiful these pendants are:

If I remember correctly, my cousin (shout-out to Corinne) said that these came from her husband's uncle who had made them himself and shipped them to her to craft with. I may have gotten that wrong, but let's just say that this is lovely handiwork from someone in my cousin's family. She loves to craft like my mother and I so graciously shared some of the pendants with us!
All that was needed for these earrings other than the pendants was some acrylic craft paint, small beads, kidney-shaped earring wires, jump rings, Superglue, tweezers and some long, thin pliers. For those wondering, kidney earring wires are the ones that have a small piece that allows the earring wire to be closed off once it's in your ear as opposed to an open wire. Here is an example if that doesn't make sense! 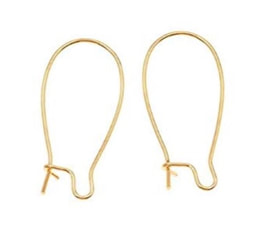
So first step was to attach the pendant to a jump ring. All I did was pry apart one jump ring with some tweezers and then slip the pendant on. Then before closing up the first jump ring, I added another to give the pendant some extra swing and make sure it faced the right way. Once this was taken care of, I just slipped the top jump ring into the indent in the wire where something is meant to hang and clamped the indent closed with some pliers to ensure that the pendant didn't slip off. Most of the pendants had a nice gold or silver detail in the middle so I did not do anything to them, but for the few that were just plain wood, I gently rubbed some blue paint on with my fingers to catch in the grooves of the design and give it a little bit of color. You will be able to see that better when I show you the finished product below!
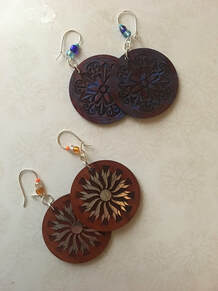
After that was adding beads to the wire itself. To each earring, I added 2-3 small beads to the wire just above the pendant so that they did not interfere with the earring, but to give them a little more sparkle and color. I added the tiniest bit of Superglue between and underneath each bead before sliding it onto the wire just to ensure that the beads stayed in place and didn't slide off of the wire. And here they are! I have more pendants and do plan on making some more earrings, but this is what I made so far:
I know today was just a quick post, but if you have any questions about these earrings, please let me know!
- Rebecca Below are Amazon links to some products similar to those that I used for this project. If you make any purchases using the links below, I will receive some of the sale. Thank you! P.S. I just linked some blank wooden pendants so if you want to make some earrings like this you get to be creative and design the pendants yourself!
|
AuthorI am a 27-year-old crafter and baker from New Hampshire! Archives
July 2024
Categories |
 RSS Feed
Proudly powered by Weebly