|
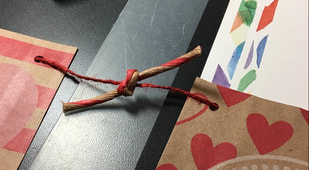
Hello, bloggy friends. It’s Suzanne, Rebecca’s Momma, here today with a cute, quick and simple Valentine ideas to dress up your home for February. Today’s craft is a swag, or garland, or banner, or bunting – they go by many names, but whatever you call them, they add a fun pop of color wherever they hang. For this item, you will need three small gift bags. I found these at The Dollar Tree (also known as “one of my favorite places to buy cheap crafting supplies”). These are lunch bag size bags, about 5 inches wide by 9 inches tall. I like the size of and craft look of these bags and purchasing the set ensures that there is a cohesive look, but this idea is easily scalable to any size bag, or to any decorative paper you might have in your stash. 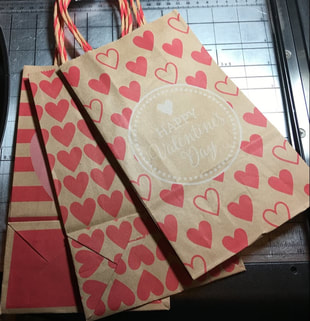 You will also need a few items from your stash -- scissors; a glue gun and glue sticks; a pencil or paper piercer; and some twine, string, or jute. I also used a paper cutter, an iron and some cardstock, but those are not required. The first thing I did was cut down one side of the gusset of the bag, then remove the bottom. That will leave you with one long flat piece. 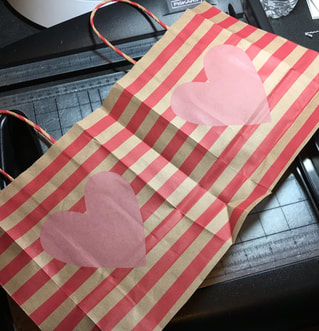 Next, I carefully removed the handles of the bag by prying up the extra piece of paper inside that holds down the ends of the handles. I did this gently, so I didn’t tear through the front of the bag. I saved those handles because I had an idea to use them later. 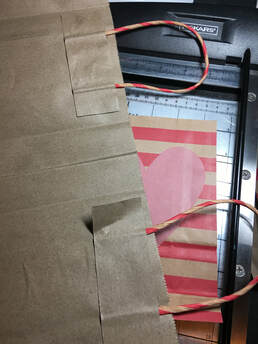 Next, I cut down both sides of the bags to get the full front and back panels to be the same size. I decided to use five panels because odd numbers are generally more appealing to the eye than even numbers. One bag said “Happy Valentine’s Day” on it, so that became my centerpiece, with the repeating hearts and large pink heart panels on each side. I then ironed the panels to get rid of the crease left on the back side of the bag where it was folded, but that’s not necessary if you aren’t bothered by the crease. 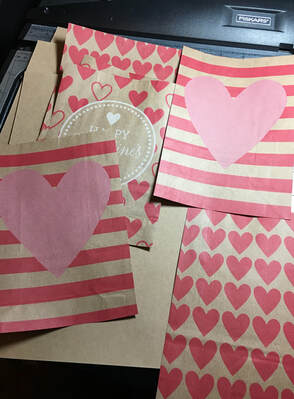 At this point, I decided to back up my bag panels with some cardstock, to make them a little sturdier. This is also not necessary, especially if you think you’ll only display this banner for one season. If you don’t have cardstock and want to do this step, you could recycle the boxes from crackers or cereal. After gluing the panels to cardstock, I trimmed one more time to get the pieces to my final size of 4 ¾ wide by 6 ¾ tall. I did all my trimming with a guillotine paper cutter, but you can simply use scissors if you don’t have a paper cutter. I wanted the panels to have a fishtail bottom, so I made myself a quick template to cut that out evenly. I decided how deep I wanted the tail to be (I didn’t want to nip off the end of the large pink hearts). I decided just under two inches was the right depth, so I cut a piece of cardstock 4 ¾ inches wide (the width of the banner) and about 2 inches wide. I folded it in half, then cut up from the corner to the fold, leaving some of the fold intact. I placed the template over the bottom of the panel, used a paper piercer to make a hole in the panel and cut up from the corner to the center hole. You could also just mark the spot with a pencil. I saved those little triangles, because they will be repurposed in a minute. 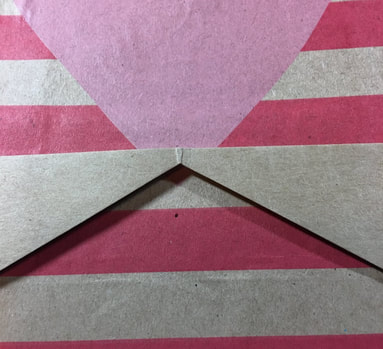 I then stacked the panels together and made two holes at the top of them, an equal distance down from the top and in from the sides. These holes will be to string the panels together. I have a tool called a Cropodile, which allowed me to punch through all five panels at ones, but with a regular paper punch, you can punch one panel and use it as the template for punching all the rest. Next, I used some twine to string the panels together. I like the look of the twine going in from the front of the panel and having the twine behind, but you can string it any way you like. I also like the panels to be stationary, instead of loose on the twine, so I decided to glue them in place. This is where I repurposed the triangles made from cutting the fishtail bottoms on the panels. I trimmed down each side of the triangle so it fit between the two holes. I measured an even distance between the panels and used some hot glue to glue the triangle over the twine, holding it in place.
Finally, I tied the bag handles between each panel to add a little extra touch and Rebecca hung this cutie up on her back porch. 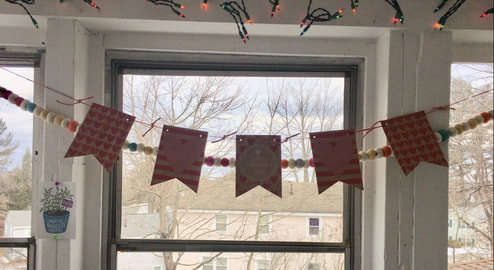 I hope today’s craft gets your wheels turning for other holidays where you could use this same idea. See you soon!
1 Comment
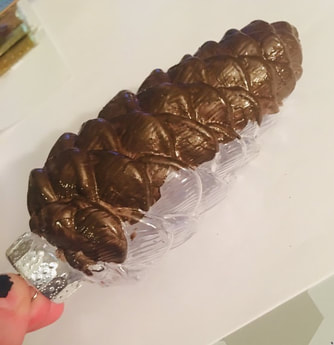
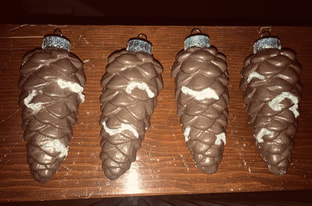
Hello friends! This week I thought I would share one of my deep dark secrets: sometimes I start new crafts projects before finishing others. I know! So shocking! I try to be as organized as I can be and try to finish and clean up one thing before I move on to another, but sometimes that doesn't quite work. I have a lot of ideas running around in my head and want to do all the things! As of right now, I have about 5 projects started, but 2 that I am really invested in, so I thought I would share what those two projects entail! First of all, I am working on some pine cone ornaments to sell at future craft fairs. I got these plastic clear pine cones at Michael's during after Christmas sales. 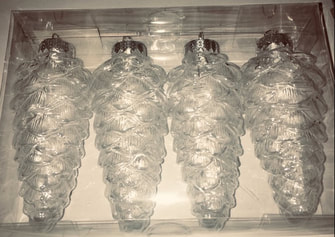 The first step for these ornaments was to paint them. Obviously I went with brown since ... well ... pine cones are brown. But I wanted something slightly more riveting than plain brown so I mixed together brown and sparkly gold craft paint to get a slightly shimmery, slightly textured brown paint. 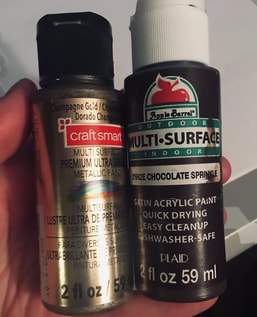 I had to do the painting in about 4 steps: 2 coats each on each half of the ornament. I didn't paint the whole surface each time, as I wanted the paint to be dry on the side I laid down on the table. After the paint was dry I did one quick coat of varnish on the ornaments to protect the paint.
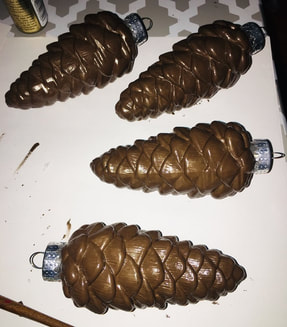
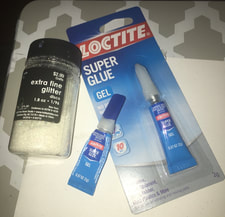
Now it was time for the fun part: SNOW! So for the snow, I used a combination of gel Super Glue and fine white glitter. I added the Super Glue to a few select spots on the ornaments and then sprinkled on some glitter to stick in the glue. Gel glue dries slower then liquid glue which allowed me to make sure that the glitter was stuck in and to shape the glue to look how I wanted. Here is what I have of these ornaments so far:
I have to add some green yarn or twine to the ornament to mimic greenery and add a hanger to the top and then I think I will be done with these. I hope to get these done by the end of the week, but we shall see what happens ... The other project I have going on currently is very near and dear to my heart. My Memere (that's what we French-Canadians call our grandmothers) was moved to a nursing home so my family has been going through her house. I was able to take some of her handwritten recipe cards and recipes that she had cut out of papers. I kept some of the recipes in a book, but knew that I wanted to do a craft with a few of them. Since I recently bought a bright, shiny, new package of Sharpies (my Sharpie obsession is strong and I can't explain it), I thought it would be fun to use those in this craft as well. I picked out some various shades of red and pink Sharpies and used those to color in the recipes like so. 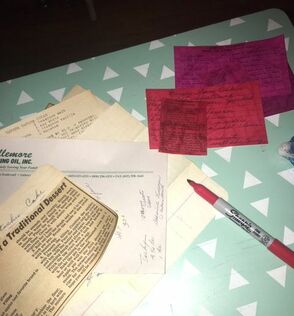 I then want to take the colored recipes and make some sort of collage in the shape of a heart with a phrase such as "The Kitchen is the Heart of the Home" on there as well. This one still has a ways to go, but I am excited to make something that has a little bit of my Memere in it!
I just wanted to do an honest blog this week about how I don't always have it all together and sometimes have multiple projects going on at once! Let me know of any craft projects you have going on in the comments below! - Rebecca Hello crafty people! This week I am working on some cute little signs for future craft fairs. Below I have the supplies that I am using to make two signs. This blog will only take you through how to make one of the two signs as I've had to adult this week and haven't had time to finish the second one! The metal hearts that I am using as the base for these signs are actually large cookie cutters from IKEA that were bought a few years ago. The sign I will be walking you through today will use the coffee bean paper, twine, white paper tape and I Love You a Latte phrase. 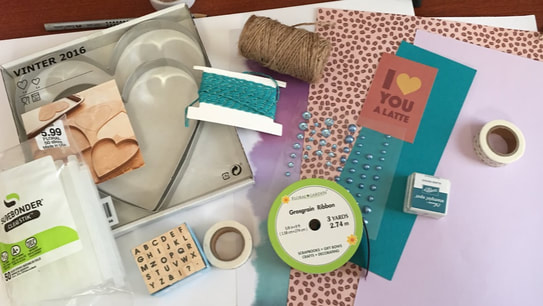 So the first step was to cut out the basic heart shape, slightly bigger than the metal heart itself to have a little room to play with. 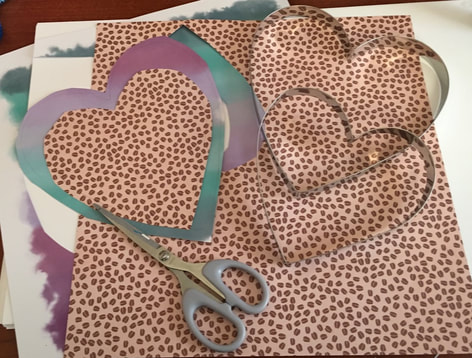 Next, I stuck some paper tape onto white printer paper to make it less opaque and cut it out. I attached the paper tape and the I Love You a Latte phrase to the coffee bean heart.  Now was time to attach the metal heart to the paper. I used my small glue gun with a small tip to glue the metal heart onto the front of the paper. 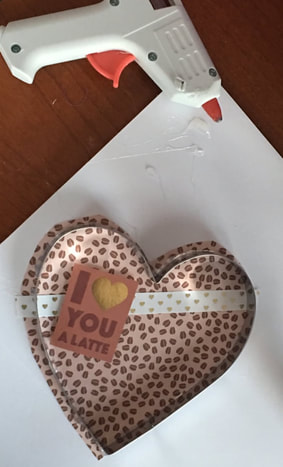 I then cut the paper on the outside of the metal circle as close as I could and began the arduous process of hot glueing twine around the entire outside edge of the heart. I will admit. This took a long time. But it ended up giving the signs more finished look and I think it added a lot to the sign! The final step was to glue a small piece of twine to the back of the sign so that it could be hung. And here it is: 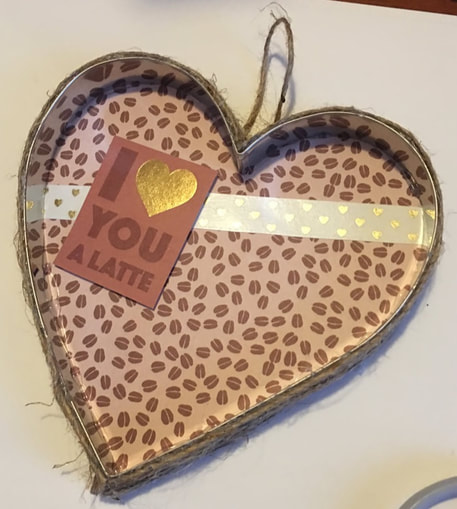 Over the next week or so I would love to make the second sign with the blue and purple papers and ribbons I had picked out. My plan is to use the ombre blue and purple paper as the base, cut a moon out of the teal paper and then stamp out the phrase I Love You to the Moon and Back on the light purple paper. I will cover the outside of the heart with some teal ribbon and altogether I think this will be a cute sign as well! Let me know what you think in the comments below!
- Rebecca Why hello everyone! Today I will be showing you how I took some Christmas clearance decorations and turned them into adorable calendars. I will be trying to sell these calendars at craft fairs later this year so they will be 2020 calendars. 2020 seems like waaaaaaay in the future, but actually it's next year which is mildly terrifying. The day after Christmas, my mother and I hit up some sales and I bought 6 of these little blocks for less than a dollar each at Hobby Lobby. I liked that they already had a clip attached to the top of the block and that the base of the block was white which could be easily changed or painted.  The first step on these blocks was to get the price stickers off of the back. I poured a small amount of Goo Gone directly on the back of the block and let it sit about 10 minutes. Then I was able to peal the majority of the stickers off and wipe away the remaining Goo Gone. 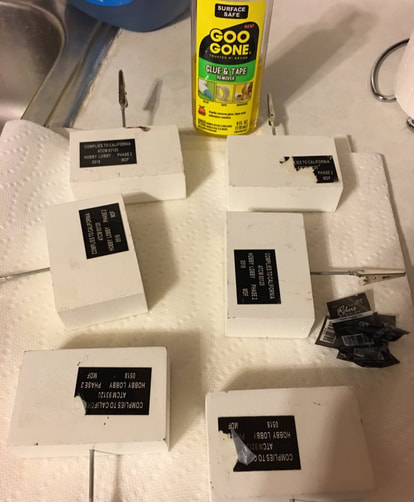 Next it was time to sand down the blocks a bit. I 100% know that I have a few pieces of sandpaper in the apartment somewhere, but after 10 minutes I couldn't find them and was getting annoyed so I decided to ruin a nail file instead. I sanded some of the edges of the blocks to give them a more worn look and sanded away any remaining adhesive left from the stickers.  Next I tried to plan out the looks I was going for with the calendars. I originally was going to make 2 blocks each of the 3 different styles and here are the paper/accessories I had picked out for the three styles: 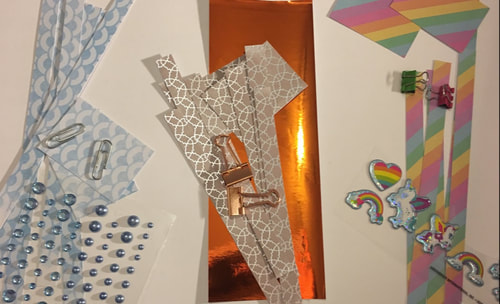 I did end up going a bit rogue and switching up the blocks a bit from what I had originally planned when I actually started making them, but I wanted to show you the original ideas I had. After planning was painting. I painted the blocks to go with the blue paper a very light blue. Shocking! I know! I used purple for the unicorn blocks and then attempted to make my own rose-gold/orange shade to go with the shiny orange paper. I also used the same method to paint all of the blocks: I spread some paint on with a paintbrush and then dabbed some paper towel at the paint to make it look a bit aged and splotchy. Here is what one of the orange-ish blocks looked like all done. 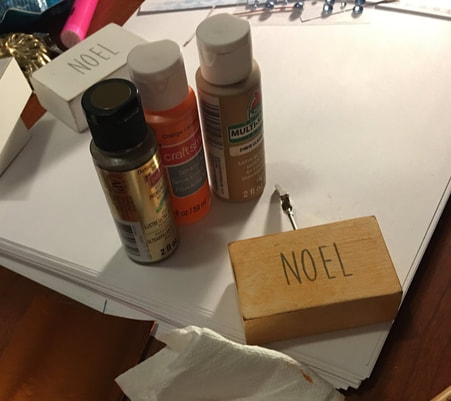 This is where I veered off track a little and changed up the styles that I had originally planned for the blocks. I ended up not using the original unicorn stickers as they were puffy, dimensional stickers and I didn't think they matched well with the style of the block. I found some paper that I liked and cut out some unicorn images from that. For the second magical themed block I went off the rails and covered the front with blue glitter paper to simulate water and then added a mermaid and narwhal sticker. I think these blocks would be great in the room of a little girl or boy who loves magic!!!! 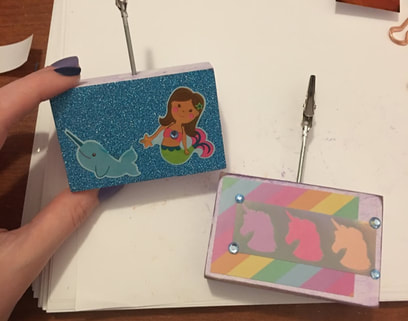 For the orange blocks I ended up not using the silvery paper I had originally paired with it. It seemed like too much shimmer going on all at once. So I decided to just add some of the orange shimmer paper to the block itself and then put some antique-looking butterfly stickers as a decoration. I also added some smaller orange sparkle accents because I enjoy sparkles and used the tips of my scissors to scuff up the orange paper to give it the look of older metal. These two blocks are my favorite of all 6! I love how these came out so much. 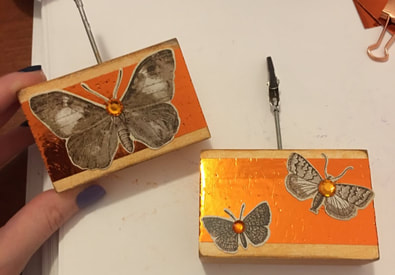 And finally we have the blue blocks. I actually used the silver paper I didn't end up using on the orange blocks and incorporated it onto the blue blocks. I added some silver number stickers to say "2020" and some blue sparkle accents and the blue blocks were done! 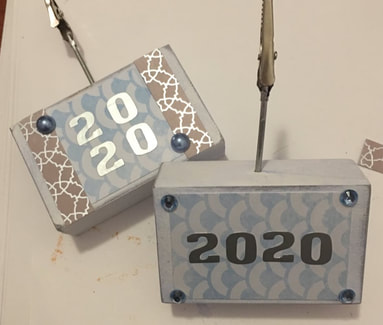 So these are not 100% finished. As we get closer to craft fair season when I will actually be trying to sell these, I will be printing out small monthly calendars for 2020. I will cut them out and stack them up in order and clip them into the top of the block. As the months progress, people can simply remove the sheets for the months that have passed and reveal the new months! Let me know what you guys think in the comments below!
- Rebecca Hello everyone! I took last week off to spend some time with my family during the holidays, but I'm back now and starting off the new year with something out of my comfort zone! This week I decided to try and make a video to introduce myself a little more and explain some of the craft projects that I had been working on. So first of all, bear with me. I made this video in my apartment with my laptop and a desk lamp pointed at my face to get adequate lighting. So needless to say, its not the highest quality, but I'm doing my best and really hope to improve with each video I make in the future! I also don't have a verified account so am only able to choose my video thumbnail from a few preset selections. This one of me looking confused and holding up a card was the best option so I had to go with it! If you have any questions about the projects I talked about in the video please feel free to leave a comment and I will be happy to respond! Here's to a crafty New Year! - Rebecca
|
AuthorI am a 27-year-old crafter and baker from New Hampshire! Archives
July 2024
Categories |
 RSS Feed
Proudly powered by Weebly